Classic Holiday Cookie Selection

A classic holiday cookie selection is a delightful assortment of festive cookies that captures the essence of the holiday season. This dish typically includes various popular cookie types, such as gingerbread, sugar cookies, and snickerdoodles, beautifully arranged for sharing and gifting. These cookies are not only delicious but also add a charming touch to any holiday gathering or charcuterie board.
| Ingredient | Quantity |
|---|---|
| All-purpose flour | 4 cups |
| Granulated sugar | 2 cups |
| Brown sugar | 1 cup |
| Unsalted butter | 1 cup (softened) |
| Eggs | 3 large |
| Baking soda | 1 teaspoon |
| Baking powder | 1 teaspoon |
| Ground cinnamon | 1 tablespoon |
| Ground ginger | 1 tablespoon |
| Vanilla extract | 2 teaspoons |
| Salt | 1 teaspoon |
| Powdered sugar | 3 cups |
| Milk | 2 tablespoons |
| Food coloring (optional) | Assorted |
| Sprinkles (optional) | Assorted |
Cooking Steps Instructions
1. Preheat the Oven:
Begin by preheating your oven to 350°F (175°C). Line baking sheets with parchment paper or silicone baking mats. This will help prevent the cookies from sticking and ascertain they cook evenly.
2. Make the Dough:
In a large mixing bowl, cream together the softened unsalted butter, granulated sugar, and brown sugar until the mixture is light and fluffy. This typically takes about 3-4 minutes using an electric mixer.
3. Add Eggs and Vanilla:
Beat in the eggs, one at a time, making certain each egg is fully incorporated before adding the next. Add the vanilla extract and mix until combined.
4. Combine Dry Ingredients:
In a separate bowl, whisk together the all-purpose flour, baking soda, baking powder, ground cinnamon, ground ginger, and salt. Gradually add this dry mixture to the wet ingredients, mixing until just combined. Avoid overmixing to ascertain tender cookies.
5. Chill the Dough (Optional):
For easier handling, chill the cookie dough in the refrigerator for about 30 minutes. This step helps prevent the cookies from spreading too much while baking.
6. Shape the Cookies:
Scoop tablespoon-sized portions of dough and roll them into balls. Place them about 2 inches apart on the prepared baking sheets. For sugar cookies, you can flatten them slightly; for snickerdoodles, roll in cinnamon sugar before placing them on the sheet.
7. Bake the Cookies:
Bake in the preheated oven for 10-12 minutes or until the edges are set and lightly golden. The centers may look slightly underbaked, but they will firm up as they cool.
8. Cool and Decorate:
Allow the cookies to cool on the baking sheet for 5 minutes before transferring them to a wire rack to cool completely. Once cool, you can decorate with icing, sprinkles, or food coloring as desired.
9. Arrange and Serve:
Once decorated, arrange the assorted cookies on a festive platter or charcuterie board. Mix and match different types of cookies for a beautiful display. Enjoy this classic holiday cookie selection with friends and family!

- The Original Pro Chopper - Our superstar veggie slicer has been creating waves on TikTok! Simple to use,...
- Easy Meal Prep with Rust-Resistant Blades - Our vegetable chopper is perfect for anyone who wants to eat...
- 5-Star Design - The soft-grip TPU handle ensures controlled chopping, while the non-skid rubber base...
Winter Wonderland Themed Board

A Winter Wonderland Themed Board showcases a beautiful array of festive treats and decorations that embody the enchanting spirit of winter. Featuring cookies, candies, and seasonal snacks arranged artfully, this board captures the magic of the season, making it perfect for holiday gatherings and celebrations. With snowflake-shaped cookies, sparkling peppermint treats, and winter-themed decorations, this festive display is sure to impress your guests.
| Ingredient | Quantity |
|---|---|
| Sugar cookies (homemade or store-bought) | 24 cookies (various shapes, such as snowflakes, stars, etc.) |
| Icing (white and blue) | 2 cups |
| Edible glitter | 2 tablespoons |
| Peppermint candies (crushed) | 1 cup |
| Chocolate-covered pretzels | 12 pretzels |
| Mini marshmallows | 1 cup |
| Coconut (shredded, for snow) | 1 cup |
| Assorted nuts (for texture) | 1 cup |
| Fresh berries (for color) | 1 cup |
| Decorative snowflakes (optional) | Assorted |
Cooking Steps Instructions
1. Prepare Your Base:
Start by choosing a large wooden or marble board as your serving base. This will act as the canvas for your Winter Wonderland arrangement. Clean the surface well and, if desired, you can also line it with parchment paper for an added festive touch.
2. Arrange the Cookies:
Begin by placing the sugar cookies on the board. Arrange them in clusters, using different shapes like snowflakes, stars, and trees. Make sure to leave enough space between the cookies for other ingredients. You can alternate the placement to create a visually appealing pattern.
3. Decorate with Icing:
Using a piping bag, apply white and blue icing on the cookies. You can create snowflake designs or simple swirls. Don’t hesitate to get creative with your decorating style! Once decorated, sprinkle edible glitter over the icing for that magical touch.
4. Add the Candies and Treats:
Next, position the crushed peppermint candies around the cookies for a pop of color and flavor. Scatter chocolate-covered pretzels along one side of the board, creating height and texture.
5. Incorporate the Marshmallows:
Fill in gaps with mini marshmallows to resemble snowdrifts. You can create small piles to give a snowy effect and make the board look fuller.
6. Utilize Coconut:
Sprinkle shredded coconut over certain areas of the board to mimic fresh snow. This will add a unique texture and enhance the winter theme.
7. Include Nuts and Berries:
Scatter assorted nuts throughout the arrangement for an added crunch. Place fresh berries, such as raspberries or blueberries, in each corner of the board, providing vibrant color against the winter theme.
8. Add Final Touches:
If available, place decorative snowflakes around the board to highlight the winter wonderland theme. Make sure everything is cohesively arranged, and feel free to adjust as necessary for balance.
9. Serve and Enjoy:
Once your Winter Wonderland Themed Board is fully arranged, it’s ready to delight your guests! Serve immediately and watch their faces light up as they dig in to this enchanting display.

- Makes Everything Simple : Just forget your bagged cheese! Only turn the handle for several times and get...
- Premium Material : All parts of the rotary cheese grater are made of food grade ABS material, no BPA. The...
- Three Option Grater : The parmesan cheese grater finishes food preparation with slicing, shredding and...
Chocolate Lovers Extravaganza

The Chocolate Lovers Extravaganza is a delightful and indulgent charcuterie board specifically designed for chocolate aficionados. This board is filled to the brim with an assortment of chocolate treats, from rich brownies to creamy chocolate-covered fruits, all beautifully arranged to create an irresistible chocolate paradise. Perfect for holiday parties or any chocolate celebration, this arrangement is certain to satisfy every sweet tooth and make for a stunning centerpiece.
| Ingredient | Quantity |
|---|---|
| Brownies (homemade or store-bought) | 12 pieces |
| Chocolate chip cookies | 12 cookies |
| Dark chocolate truffles | 12 pieces |
| Chocolate-covered strawberries | 12 strawberries |
| Milk chocolate pretzel bites | 1 cup |
| Mini chocolate bars (assorted flavors) | 1 cup |
| Chocolate ganache (for dipping) | 1 cup |
| Whipped cream or chocolate mousse | 1 cup |
| Shredded coconut (optional) | 1/2 cup |
| Decorative chocolate sprinkles | Assorted |
Cooking Steps Instructions
1. Prepare the Base:
Begin by selecting a large, attractive charcuterie board or platter as your base. You may also use a clean, large plate if you don’t have a dedicated board. Confirm the surface is clean and dry, ready for an enticing arrangement.
2. Position the Brownies:
Start by placing the brownies on one end of the board. Cut them into bite-sized squares, arranging them neatly in a cluster. This will serve as a foundation for the chocolate extravaganza.
3. Add the Chocolate Chip Cookies:
Next, position the chocolate chip cookies alongside the brownies. Aim for a harmonious arrangement by mixing some cookies in with the brownies, allowing for a fun combination of flavors and textures.
4. Incorporate the Dark Chocolate Truffles:
Scatter the dark chocolate truffles around the board, creating small groups to add visual interest. You can place them in small decorative cups or directly on the board for a more casual look.
5. Arrange Chocolate-Covered Strawberries:
Now it’s time for the chocolate-covered strawberries. These should be arranged in a separate area to create a vibrant contrast against the rich colors of the other chocolate items. Confirm they are evenly spaced and poised for easy picking.
6. Add the Milk Chocolate Pretzel Bites:
Fill in gaps with milk chocolate pretzel bites. These add a salty-sweet flavor that complements all the other treats. Scatter them lightly around the board for a casual vibe.
7. Include Mini Chocolate Bars:
Use mini chocolate bars to add variety and different flavor profiles. Place them in groups or rows to help guests easily pick their favorites.
8. Prepare the Dipping Options:
Place a small bowl of chocolate ganache in the center of the board. This will serve as a delicious dipping option for the cookies, brownies, and strawberries.
9. Add Whipped Cream or Chocolate Mousse:
If using whipped cream or chocolate mousse, spoon it into a small decorative bowl and place it next to the chocolate ganache to provide another layer of indulgence.
10. Garnish with Coconut and Sprinkles:
For a finishing touch, sprinkle shredded coconut (optional) and decorative chocolate sprinkles around the board. This will create a visually pleasing effect and enhance the overall presentation.
11. Serve and Enjoy:
Finally, make certain to have small plates and utensils available for guests to help themselves. Sit back and enjoy the smiles and delight that your Chocolate Lovers Extravaganza will surely bring!

- 💰 REDUCE WASTE AND SAVE MONEY: Chef Preserve keeps FOOD FRESH 5 TIMES LONGER than non-vacuum storage...
- ✅ POWERFUL, QUICK & EASY TO USE: Simply press the button to start. The device vacuum seals a bag in 5...
- ♻️ REUSABLE & RESEALABLE BAGS: Chef Preserve comes with dishwasher, freezer, refrigerator, and...
Gingerbread House Build Kit

The Gingerbread House Build Kit is a fun and interactive treat perfect for families and friends during the holiday season. This delightful kit allows you to create your own charming gingerbread house, complete with all the necessary components like gingerbread pieces, royal icing for assembly, and an assortment of colorful candies for decoration. It’s a wonderful way to release your creativity while enjoying a delicious festive activity!
| Ingredient | Quantity |
|---|---|
| Gingerbread house pieces | 1 kit (pre-baked) |
| Royal icing | 1 batch (about 2 cups) |
| Assorted candies (gummy bears, M&Ms, etc.) | 2 cups |
| Mini marshmallows | 1 cup |
| Candy canes | 1 cup (crushed or whole) |
| Sprinkles | 1/2 cup |
| Optional: edible glitter | 1/4 cup |
Cooking Steps Instructions
1. Prep Your Space:
Start by setting up a clean and spacious working area where everyone can comfortably assemble their gingerbread houses. Lay down a clean tablecloth or parchment paper to catch any icing drips or stray candies.
2. Gather Your Ingredients:
Unpack your gingerbread house kit, making sure all the pieces are present and that the royal icing is stiff enough to hold the house together. If needed, prepare the royal icing according to your recipe, verifying it reaches a pipeable consistency.
3. Assemble the Gingerbread House:
Take the two side wall pieces and apply a generous amount of royal icing along the edges. Attach these walls to the base (the bottom piece of the house) and hold them in place for a few seconds to guarantee they stick. Next, repeat this process with the front wall followed by the back wall, securing all walls together with icing.
4. Let It Set:
Allow the gingerbread house to sit undisturbed for about 10-15 minutes. This resting time is essential, as it gives the royal icing a chance to set and strengthens the structure before adding the roof.
5. Add the Roof:
Once the walls have set, apply royal icing to the edges of the roof pieces and position them on top of the walls. Adjust as needed to make sure they are aligned and stable. Hold in place for a few seconds, and allow them to set.
6. Decorate the House:
Let your creative flair shine by decorating the assembled gingerbread house. Use royal icing to create decorative patterns on the walls and roof. Then, add an assortment of candies, sprinkles, and mini marshmallows to embellish your house as desired.
7. Finish Touches:
If desired, add a layer of crushed candy canes as “snow” around the house and on the roof for a festive touch. You can even sprinkle some edible glitter to give your gingerbread house a twinkling appearance.
8. Display and Enjoy:
Once fully decorated, find a suitable spot to display your gingerbread house as a festive centerpiece. When ready, gather friends and family to admire the creation and perhaps have a sweet treat from the house!
Now you’re all set to create a magical gingerbread house with your kit, making beautiful edible memories to cherish this holiday season!

- Generous Capacity: 7-quart slow cooker that comfortably serves 9+ people or fits a 7-pound roast
- Cooking Flexibility: High or low slow cooking settings, with convenient warm function for ideal serving...
- Convenient: Set it and forget it feature enables you to cook while at work or performing daily tasks
Nut-Free Festive Delights

Nut-Free Festive Delights are a wonderful addition to any holiday gathering, perfect for those with nut allergies or for anyone looking to indulge in some festive cheer without the worry. These delightful treats are made from a blend of rich flavors and textures, providing a safe yet delicious alternative for all to enjoy. Perfect for sharing or as gifts, these nut-free cookies offer a taste of the holidays that everyone can appreciate.
| Ingredient | Quantity |
|---|---|
| All-purpose flour | 2 cups |
| Baking powder | 1 teaspoon |
| Baking soda | 1/2 teaspoon |
| Salt | 1/4 teaspoon |
| Unsweetened cocoa powder | 1/2 cup |
| Granulated sugar | 1 cup |
| Brown sugar | 1/2 cup |
| Unsalted butter (softened) | 1 cup |
| Eggs | 2 large |
| Vanilla extract | 1 teaspoon |
| Powdered sugar | For dusting |
| Optional: Holiday sprinkles | For decoration |
Cooking Steps Instructions
1. Preheat the Oven:
Preheat your oven to 350°F (175°C). Line two baking sheets with parchment paper to prevent the cookies from sticking.
2. Combine Dry Ingredients:
In a large mixing bowl, whisk together the all-purpose flour, baking powder, baking soda, salt, and cocoa powder. Set this mixture aside.
3. Cream the Butter and Sugars:
In another bowl, use an electric mixer to beat the softened butter, granulated sugar, and brown sugar together until the mixture is light and fluffy.
4. Add Eggs and Vanilla:
Beat the eggs, one at a time, into the butter-sugar mixture. After incorporating the eggs, add the vanilla extract and mix until well combined.
5. Combine Wet and Dry Ingredients:
Gradually add the dry ingredients to the wet mixture, mixing on low speed until just combined. Do not overmix, as this may cause the cookies to become tough.
6. Shape the Cookies:
Use a cookie scoop or tablespoon to form dough balls and place them on the prepared baking sheets, leaving space between each for spreading.
7. Optional Decoration:
If desired, sprinkle the tops of the dough balls with holiday sprinkles before baking for a festive touch.
8. Bake the Cookies:
Place the baking sheets in the oven and bake for 10-12 minutes, or until the edges are set and the tops are slightly cracked.
9. Cool the Cookies:
Once baked, remove the cookies from the oven and let them rest on the baking sheets for 5 minutes before transferring them to a wire rack to cool completely.
10. Finish and Serve:
Once cooled, dust the cookies with powdered sugar if desired. Your Nut-Free Festive Delights are now ready to be enjoyed! Serve at gatherings, or package them in decorative containers for gifting.

- 100% Leak-proof: Guaranteed no-spill seal and secure latches
- Crystal-clear Tritan Built: Stain-resistant and odor-resistant material for a clear view of contents
- Lightweight & Sturdy: Easy to carry, yet durable for everyday use
Spiced Up Cookie and Treat Combo

This Spiced Up Cookie and Treat Combo is a festive assortment of cookies and treats that feature a delightful blend of warming spices, perfect for the holiday season. This combination not only looks beautiful on a charcuterie board, but the rich flavors and textures offer a comforting taste of the season for everyone to enjoy. Ideal for sharing, these treats will elevate any holiday gathering.
| Ingredient | Quantity |
|---|---|
| All-purpose flour | 3 cups |
| Baking powder | 1 teaspoon |
| Baking soda | 1/2 teaspoon |
| Ground cinnamon | 1 tablespoon |
| Ground nutmeg | 1 teaspoon |
| Ground ginger | 1 teaspoon |
| Salt | 1/2 teaspoon |
| Granulated sugar | 1 cup |
| Brown sugar | 1 cup |
| Unsalted butter (softened) | 1 cup |
| Eggs | 2 large |
| Vanilla extract | 2 teaspoons |
| Molasses | 1/4 cup |
| Powdered sugar | For dusting |
| Optional: Decorative sprinkles | For topping |
Cooking Steps Instructions
1. Preheat the Oven:
Preheat your oven to 350°F (175°C). Prepare two baking sheets by lining them with parchment paper to guarantee the cookies do not stick.
2. Mix Dry Ingredients:
In a large mixing bowl, whisk together the all-purpose flour, baking powder, baking soda, ground cinnamon, ground nutmeg, ground ginger, and salt. Set this mixture aside.
3. Cream Together Sugars and Butter:
In another bowl, use an electric mixer to cream together the softened butter, granulated sugar, and brown sugar until the mixture is light and fluffy.
4. Incorporate Eggs and Vanilla:
Add the eggs to the butter-sugar mixture, one at a time, mixing well after each addition. Then add the vanilla extract and molasses, mixing until well combined.
5. Combine Wet and Dry Ingredients:
Gradually add the dry ingredients to the wet ingredients, mixing on low speed until all ingredients are just combined. Avoid overmixing to keep the cookies tender.
6. Shape the Cookies:
Use a cookie scoop or a tablespoon to drop rounded balls of dough onto the prepared baking sheets, keeping them spaced apart for spreading.
7. Optional Decoration:
If desired, sprinkle a bit of decorative sprinkles on top of each dough ball for a festive touch before baking.
8. Bake the Cookies:
Place the baking sheets in the preheated oven and bake for 10-12 minutes, or until the edges are firm and the tops are set but still soft.
9. Cooling:
Remove the cookies from the oven and let them cool on the baking sheets for about 5 minutes before transferring them to a wire rack to cool completely.
10. Serve:
Once cooled, you can dust the cookies with powdered sugar if desired, and arrange them on your charcuterie board alongside other treats for a beautifully festive presentation.

- 𝗘𝗳𝗳𝗼𝗿𝘁𝗹𝗲𝘀𝘀 𝗪𝗲𝗶𝗴𝗵𝗶𝗻𝗴: Supports 5 units...
- 𝗣𝗿𝗲𝗰𝗶𝘀𝗲 𝗥𝗲𝘀𝘂𝗹𝘁𝘀: Accurately weighs up to 11 lb/5 kg with 1 g...
- 𝗦𝗶𝗺𝗽𝗹𝗲 & 𝗖𝗼𝗺𝗽𝗮𝗰𝘁: The small and sleek scale is a perfect fit for...
DIY Cookie Decorating Station

A DIY Cookie Decorating Station is a fun and engaging way to make your holiday gatherings more interactive and enjoyable. Guests of all ages can express their creativity by decorating freshly baked cookies using a variety of frostings, sprinkles, and toppings. This experience not only creates festive treats but also generates wonderful memories as everyone embraces the holiday spirit together.
| Ingredient | Quantity |
|---|---|
| Sugar cookies (baked and cooled) | 24 cookies |
| Royal icing (prepared in various colors) | 3 cups (divided into bowls for coloring) |
| Edible glitter | As desired |
| Colored sprinkles | Assorted varieties |
| Mini chocolate chips | 1 cup |
| Candy canes (crushed) | 1 cup |
| Gumdrops | 1 cup |
| Marshmallows | 1 cup |
| Piping bags with various tips | Several |
| Food coloring gel | Various colors |
Cooking Steps Instructions
1. Set Up the Station:
Choose a spacious area on a table or countertop for the decorating station. Lay down a festive tablecloth or some parchment paper to catch any spills or crumbs.
2. Prepare Cookies:
Ensure your sugar cookies are baked, cooled, and ready for decorating. You may want to prepare a mix of shapes (like stars, trees, and gingerbread men) for a fun display.
3. Make Royal Icing:
Prepare your royal icing (if not done already) using egg whites or meringue powder, powdered sugar, and water. Divide the icing into multiple bowls and tint each batch with different food coloring gels for variety.
4. Set Up Decorating Supplies:
Arrange all decorating supplies within easy reach, including the bowls of colored royal icing, piping bags filled with frosting, sprinkles, edible glitter, mini chocolate chips, and other toppings.
5. Introduce Coloring Techniques:
Briefly explain to guests how to use the piping bags to create designs on the cookies. Demonstrate how to outline cookies with thicker icing and then fill in the center with runnier icing.
6. Encourage Creativity:
Invite guests to start decorating their cookies! Encourage them to use different colors and toppings, and to take inspiration from one another.
7. Create a Display:
As the guests complete their designs, provide a festive plate or tray for them to display their finished cookies. This makes for a lovely centerpiece for your gathering.
8. Allow Icing to Set:
Once everyone has decorated their cookies, allow the icing to set for at least 30 minutes before serving or packaging them for guests to take home.
9. Enjoy the Treats:
Once the decorating is done, gather everyone to admire the delicious cookie creations and enjoy tasting each other’s delightful designs, making the event a truly festive celebration!

- Instant Read Food Thermometer | Our instant read thermometer features a temperature probe and advanced,...
- Multi-Use | From bbq thermometer to baking thermometer, our digital food thermometer for cooking is...
- Easy-Read Digital Thermometer For Cooking | Large instant thermometer dial with bright blue backlight...
Vintage Christmas Cookie Collection

The Vintage Christmas Cookie Collection is a delightful assortment of classic cookie recipes that have stood the test of time, perfect for evoking nostalgia during the holiday season. These cookies not only offer a delicious taste but also bring back fond memories of Christmases past. From traditional gingerbread men to buttery shortbread, this collection aims to please any festive gathering.
| Ingredient | Quantity |
|---|---|
| All-purpose flour | 4 cups |
| Granulated sugar | 2 cups |
| Brown sugar (packed) | 1 cup |
| Unsalted butter (softened) | 1 ½ cups |
| Eggs | 3 large |
| Baking powder | 2 teaspoons |
| Baking soda | 1 teaspoon |
| Ground cinnamon | 2 teaspoons |
| Ground nutmeg | ½ teaspoon |
| Vanilla extract | 2 teaspoons |
| Salt | ½ teaspoon |
| Molasses | ½ cup |
| Powdered sugar (for icing) | 3 cups |
| Milk (for icing) | 2-3 tablespoons |
| Food coloring (optional) | Various colors |
| Decorative sprinkles | Assorted varieties |
Cooking Steps Instructions
1. Prepare Your Workspace:
Begin by gathering all your ingredients and tools. Preheat your oven to 350°F (175°C) and line baking sheets with parchment paper.
2. Make the Cookie Dough:
In a large mixing bowl, cream together the softened unsalted butter, granulated sugar, and brown sugar until light and fluffy. Beat in the eggs, one at a time, followed by the vanilla extract and molasses until well combined.
3. Mix Dry Ingredients:
In another bowl, whisk together the all-purpose flour, baking powder, baking soda, ground cinnamon, ground nutmeg, and salt until fully blended.
4. Combine Mixtures:
Gradually add the dry mixture to the wet mixture, stirring until a smooth dough forms. Avoid overmixing.
5. Chill the Dough:
Cover the dough with plastic wrap and refrigerate for at least 30 minutes. This helps the cookies retain their shape while baking and enhances their flavor.
6. Shape the Cookies:
Once the dough is chilled, take spoonfuls of dough and roll them into balls (or use cookie cutters for shapes) and place them onto the prepared baking sheets, leaving space between them.
7. Bake:
Bake in the preheated oven for 10-12 minutes or until the edges are lightly golden. Remove the cookies from the oven and let them cool on the baking sheets for 5 minutes before transferring them to a wire rack to cool completely.
8. Prepare Icing:
In a medium bowl, mix powdered sugar with milk until it reaches your desired consistency for icing. If desired, divide into smaller bowls and add food coloring to make various shades.
9. Decorate:
Once the cookies are completely cooled, use the icing to decorate them creatively. You can drizzle, pipe, or dip cookies in icing and add sprinkles for a festive touch.
10. Enjoy Your Cookies:
After decorating, arrange the cookies on a festive platter for your holiday gathering or gift them to friends and family. Enjoy the delicious memories that come with each bite!

- Versatile 54-Piece Collection: Elevate your kitchen with the Home Hero 54-Piece Kitchen Utensil Set, a...
- Durable and Long-Lasting: Crafted from premium stainless steel, these kitchen utensils are designed to...
- Perfect Holiday Gift: Delight your loved ones with this kitchen utensils gift set this festive season....
International Holiday Cookie Sampler

The International Holiday Cookie Sampler is a festive array of cookies inspired by holiday traditions from around the world. This sampler features a variety of flavors and styles, allowing you to celebrate the season with unique tastes from different cultures. From buttery Italian biscotti to spiced Mexican marranitos, this assortment is perfect for sharing with family and friends during holiday gatherings.
| Ingredient | Quantity |
|---|---|
| All-purpose flour | 5 cups |
| Granulated sugar | 2 cups |
| Baking soda | 1 teaspoon |
| Baking powder | 2 teaspoons |
| Unsalted butter (softened) | 1 ½ cups |
| Eggs | 4 large |
| Vanilla extract | 2 teaspoons |
| Ground cinnamon | 1 teaspoon |
| Ground ginger | 1 teaspoon |
| Ground nutmeg | ½ teaspoon |
| Almond extract | 1 teaspoon |
| Molasses | ½ cup |
| Powdered sugar | 2 cups (for icing) |
| Milk | 3-4 tablespoons |
| Assorted food coloring | Various colors |
| Assorted decorative sprinkles | Various varieties |
| Cocoa powder (for chocolate cookies) | 1/2 cup |
Cooking Steps Instructions
1. Prepare Your Workspace:
Begin by preheating your oven to 350°F (175°C) and lining multiple baking sheets with parchment paper. Gather all the ingredients and have them handy for mixing.
2. Make the Dough for Each Cookie Type:
You can choose to make three distinct cookie types:
- Gingerbread Cookies: In a bowl, cream together ½ cup softened butter and 1 cup granulated sugar. Add 1 large egg, 1 teaspoon vanilla extract, ½ cup molasses, 1 teaspoon ground ginger, and 1 teaspoon ground cinnamon. Mix well. In another bowl, whisk together 2 cups flour, 1 teaspoon baking soda, salt, and blend into the wet ingredients to form the dough. Chill for 30 minutes before shaping.
- Biscotti: In another mixing bowl, cream ½ cup softened butter and 1 cup sugar. Beat in 2 eggs and 1 teaspoon almond extract. Combine 2 cups flour, 1 teaspoon baking powder, and 1 teaspoon cinnamon, and then mix into the first bowl. Form into two logs, and bake for 30 minutes, let cool, slice, and bake again for 10 minutes for a crunch.
- Mexican Marranitos: Blend 1 cup brown sugar with ½ cup softened butter, add 1 egg, 1 teaspoon of vanilla extract, and mix in 3 cups of flour, ½ cup cocoa powder, 1 teaspoon baking powder, and ½ teaspoon cinnamon. Shape into little piglet forms and bake for 13-15 minutes.
3. Prepare Icing (Optional):
In a bowl, beat together 2 cups powdered sugar with 3-4 tablespoons of milk until you reach the desired consistency for icing. If desired, separate into smaller bowls to color with food coloring for decoration.
4. Bake the Cookies:
Using a tablespoon for the gingerbread and marranitos, drop spoonfuls of dough onto the baking sheets, spaced well apart. For the biscotti, shape logs instead. Bake all cookies for 10-15 minutes, keeping a close eye on them to verify they don’t burn.
5. Let Cool:
Allow the cookies to cool on the baking sheets for a few minutes before transferring to wire racks to cool completely.
6. Decorate:
Once completely cooled, decorate the cookies with icing and sprinkles if desired. Be creative—using different colors can add to the holiday spirit.
7. Serve and Enjoy:
Arrange a beautiful platter with your international cookie selection for everyone to enjoy during the holiday festivities.
This International Holiday Cookie Sampler not only satisfies sweet cravings but also appreciates diverse holiday traditions around the world!

- 24-ounce insulated stainless-steel water bottle with a FreeSip spout and push-button lid with lock
- Patented FreeSip spout designed for either sipping upright through the built-in straw or tilting back to...
- Protective push-to-open lid keeps spout clean; convenient carry loop doubles as a lock
Kid-Friendly Cookie Wonderland

Transform your holiday baking into a delightful adventure with a Kid-Friendly Cookie Wonderland! This charming collection of colorful and fun cookies is perfect for children to help create, with easy-to-follow shapes, designs, and a festive presentation. Each cookie can be decorated with vibrant icing, sprinkles, and candies, making it an exciting activity that brings joy to the entire family during the holiday season.
| Ingredient | Quantity |
|---|---|
| All-purpose flour | 4 cups |
| Granulated sugar | 1 ½ cups |
| Baking soda | 1 teaspoon |
| Baking powder | 1 teaspoon |
| Unsalted butter (softened) | 1 cup |
| Eggs | 2 large |
| Vanilla extract | 1 teaspoon |
| Milk | 2-3 tablespoons |
| Powdered sugar | 3 cups (for icing) |
| Assorted food coloring | Various colors |
| Assorted decorative sprinkles | Various varieties |
| Mini chocolate chips | 1 cup |
| Candy canes (crushed) | 1 cup |
| Gumdrops | 1 cup |
Cooking Steps Instructions
1. Prepare Your Workspace:
Preheat your oven to 350°F (175°C) and line several baking sheets with parchment paper. Make sure your workspace is clear and all ingredients are within reach for easy mixing.
2. Make the Cookie Dough:
In a large mixing bowl, cream together 1 cup softened butter and 1 ½ cups granulated sugar until light and fluffy. This should take about 3-5 minutes. Then, add 2 large eggs and 1 teaspoon of vanilla extract and mix until fully combined.
3. Combine Dry Ingredients:
In a separate bowl, whisk together 4 cups of all-purpose flour, 1 teaspoon baking powder, and 1 teaspoon baking soda. Gradually add the dry ingredient mixture to the wet ingredients, mixing until a soft dough forms.
4. Chill if Necessary:
If the dough is too sticky, wrap it in plastic wrap and refrigerate for about 30 minutes. Chilling makes it easier to roll out and shape the cookies.
5. Shape the Cookies:
Sprinkle flour on your work surface and roll out the cookie dough to about ¼ inch thickness. Use cookie cutters of various shapes (stars, trees, gingerbread men) to cut out the cookies and place them on the prepared baking sheets.
6. Bake the Cookies:
Bake in the preheated oven for about 8-10 minutes, or until the edges are lightly golden. Remove from the oven and let the cookies cool on the baking sheets for 5 minutes before transferring them to a wire rack to cool completely.
7. Prepare the Icing:
In a medium bowl, mix 3 cups of powdered sugar with 2-3 tablespoons of milk and a few drops of assorted food coloring until you achieve a smooth, pipeable consistency. Adjust with more sugar or milk if necessary.
8. Decorate:
Once the cookies have completely cooled, let the kids help decorate! Use the colored icing to create fun designs, and encourage them to add sprinkles, mini chocolate chips, or crushed candy canes for festive flair.
9. Display Your Wonderland:
Once decorated, arrange the cookies on a festive plate or charcuterie board. You can even set them up in a creative display, inviting children to help create their own cookie wonderland.
10. Enjoy Together:
Gather around and celebrate the holiday spirit by sharing these delicious cookies with family and friends. Encourage creativity and enjoy the tasty results of your collective efforts!
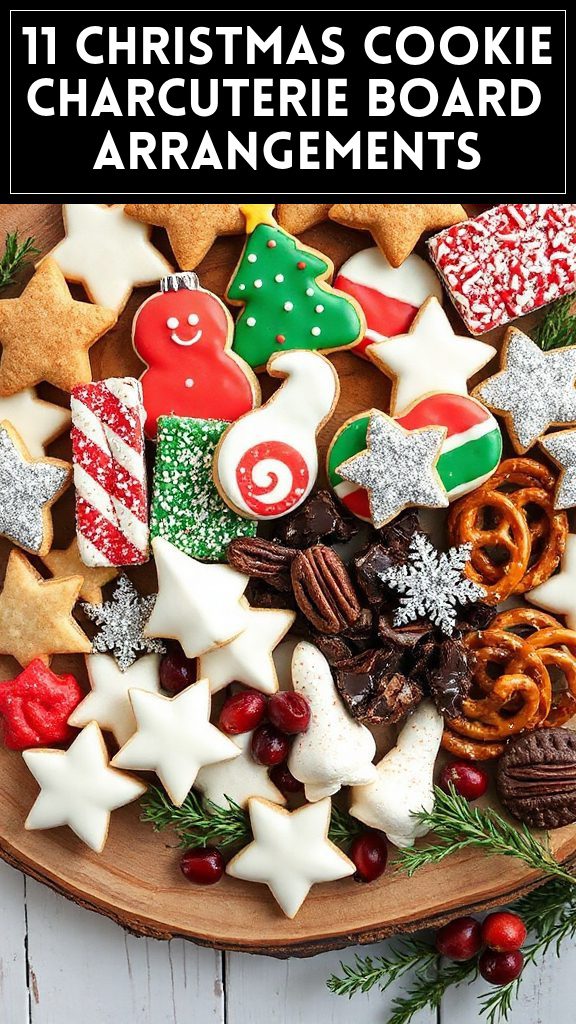
Elegant Dessert Charcuterie With Cookies

An Elegant Dessert Charcuterie Board featuring cookies is a beautifully arranged platter that combines a variety of rich, sweet cookie flavors and textures, complemented by other delightful treats. This sophisticated dessert board not only showcases the cookies’ artistry but also creates an inviting atmosphere for family gatherings and holiday celebrations. It’s an engaging way to present an assortment of homemade and store-bought goodies that will impress your guests and provide a delicious end to any festive meal.
| Ingredient | Quantity |
|---|---|
| Assorted homemade cookies | 2 dozen (various types) |
| Brownie bites | 12 pieces |
| Mini cheesecakes | 6 pieces |
| Fresh fruits (e.g., berries, sliced apples) | 2 cups |
| Dark chocolate bark | 1 cup |
| Nuts (e.g., almonds, walnuts) | 1 cup |
| Assorted chocolates | 1 cup |
| Caramel sauce | ½ cup |
| Whipped cream (optional) | 1 cup |
| Decorative edible flowers | As desired |
Cooking Steps Instructions
1. Select Your Cookies:
Choose a variety of cookies to feature on your charcuterie board. Consider options like sugar cookies, chocolate chip cookies, gingerbread cookies, and shortbread. You can either bake these cookies yourself or purchase them from a bakery.
2. Prepare the Board:
Select a large serving board or platter; wood, marble, or slate boards work wonderfully. Make sure it’s clean and ready for presentation.
3. Arrange the Cookies:
Start by placing the larger cookies on the board first, distributing them evenly spaced to create a balanced look. Fill in any gaps with smaller cookies, ensuring a variety of colors and shapes are visible.
4. Add Additional Desserts:
Incorporate brownie bites and mini cheesecakes next to the cookies. These should be positioned in a way that allows them to complement the cookies without overcrowding the board.
5. Incorporate Fresh Fruits:
Strategically place fresh fruits, such as berries and sliced apples, throughout the board to add a splash of color and freshness that pairs well with the sweeter items.
6. Fill In With Treats:
Sprinkle nuts and assorted chocolates between the cookies and desserts. This will add texture and variety to the overall presentation—make sure to space these items out for visual appeal.
7. Add Sweet Accents:
Drizzle caramel sauce in a small bowl on the board for a dipping option, and place whipped cream nearby if desired. This instantly elevates the dessert experience.
8. Decorate Finishing Touches:
For the final touch, add decorative edible flowers around the board. This gives your charcuterie an elegant and sophisticated look that enhances the festive spirit.
9. Serve:
Provide small plates and forks for guests, making it easy for them to help themselves. Enjoy the elegant aesthetic and delicious assortment of treats that your dessert charcuterie board has to offer!