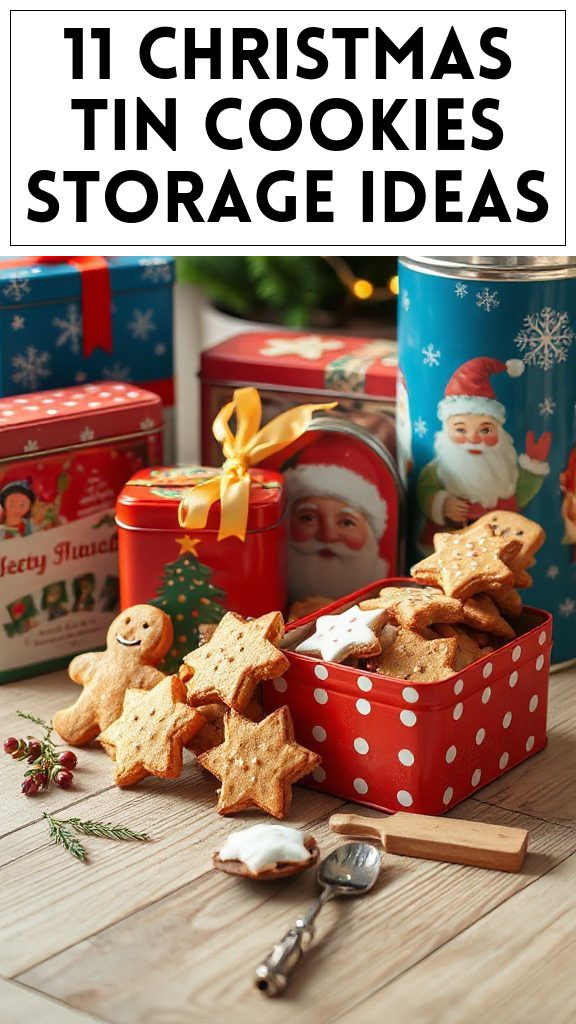
Vintage-Inspired Cookie Tins

Vintage-inspired cookie tins make for a delightful way to store your homemade Christmas cookies while adding a charming aesthetic to your kitchen. These decorative tins come in various designs, evoking nostalgia and adding personality to your holiday baking experience. While you can purchase these tins, creating your own requires some creativity and attention to detail. Follow this recipe to make a personalized vintage-inspired cookie tin that will become a cherished part of your holiday traditions.
| Ingredients | Quantity |
|---|---|
| Empty tin (metal or cardboard) | 1 |
| Decorative paper (wrapping or scrapbook paper) | 2-3 sheets |
| Mod Podge or craft glue | 1 bottle |
| Scissors | – |
| Paintbrush | – |
| Ribbon or twine | 1 spool |
| Decorative embellishments (e.g., stickers, buttons) | As desired |
| Printable labels | As desired |
Cooking Steps Instructions
- Choose Your Tin: Start with an empty metal or cardboard tin. Confirm it’s clean and free from any old labels or residue.
- Select Your Paper: Choose decorative paper that reflects a vintage style—think floral patterns, holiday motifs, or classic colors like red, green, or gold.
- Cut the Paper: Measure the dimensions of the tin. Cut pieces of decorative paper to fit around the sides and top of the tin. You’ll typically need one larger piece for the sides and a circle for the top.
- Apply Glue: Using a paintbrush, apply a layer of Mod Podge or craft glue to the tin’s surface where you’ll attach the paper. Work in small sections to avoid the glue drying out before you can apply the paper.
- Attach the Paper: Carefully place the first piece of cut paper onto the glued area of the tin. Smooth it out with your hands or a clean brush to eliminate any bubbles or wrinkles. Repeat this process for the sides and top of the tin.
- Seal the Paper: Once all paper is attached, apply a thin coat of Mod Podge on top of the decorative paper to seal it. Allow it to dry completely as per the product instructions.
- Add Embellishments: Once dry, personalize your tin with decorative embellishments. Glue on stickers, buttons, or other embellishments that enhance the vintage look.
- Create a Label: Design a label for your tin that includes the type of cookies you’ll be storing inside. Print it out and glue it onto the front of the tin. You can also write in cursive for a more vintage feel.
- Dress It Up: Use ribbon or twine to wrap around the lid or neck of the tin. You can tie a bow or leave it hanging for an extra touch of charm.
- Store Your Cookies: Fill your beautifully decorated tin with your favorite Christmas cookies, and seal it up. Not only will your cookies stay fresh, but they will also be presented in a fashionable way!
These vintage-inspired cookie tins are perfect for gifting or for your own holiday gatherings, adding a handmade touch to your cookie storage needs. Enjoy your festive baking!

- The Original Pro Chopper - Our superstar veggie slicer has been creating waves on TikTok! Simple to use,...
- Easy Meal Prep with Rust-Resistant Blades - Our vegetable chopper is perfect for anyone who wants to eat...
- 5-Star Design - The soft-grip TPU handle ensures controlled chopping, while the non-skid rubber base...
Personalized Name Tags for Each Tin

Personalized name tags for each tin can elevate your Christmas cookie storage system by adding a thoughtful touch to your gifts. Not only do these name tags help recipients identify the specific cookies within, but they also add a bit of festive charm to your beautifully decorated tins. Creating name tags requires minimal materials and can be a fun craft to do while preparing for the holiday season.
| Ingredients | Quantity |
|---|---|
| Cardstock or heavy paper | 2-3 sheets |
| Scissors | – |
| String or ribbon | 2-3 yards |
| Markers or pens | 1-2 each |
| Stickers or stamps (optional) | As desired |
| Printable template for tags (optional) | – |
Cooking Steps Instructions
- Prepare the Cardstock: Start by selecting a color of cardstock or heavy paper that matches the theme of your vintage tins. Cut the cardstock into uniform rectangles or squares. The size can vary depending on your preference, but a good dimension is about 3 inches by 2 inches.
- Design the Tags: Use markers or pens to personalize each tag. Write the name of the cookie type being stored in the tin, such as “Gingerbread Men,” “Chocolate Chip,” or any other festive name. Feel free to get creative with doodles or festive drawings around the text.
- Add Personal Touches: Enhance your tags with stickers or stamps to add extra flair. You can also add a festive border around the edges using colored markers to make them more eye-catching.
- Create a Hole for String: Once your design is complete, use scissors or a hole punch to create a small hole at the top of each tag. This will allow you to attach the string or ribbon easily.
- Cut the String: Cut lengths of string or ribbon about 6 inches long for each tag, ensuring they’re long enough to tie around the cookie tins securely.
- Attach the Tags: Thread the string or ribbon through the hole and tie it into a knot or bow. Make sure the tag hangs nicely on the side of the tin, displaying the cookie type prominently.
- Finish Up: Hang the tags on all your vintage cookie tins and display them proudly. Your personalized name tags will not only help distinguish the cookies but also add a charming touch to your holiday gifts and gatherings.

- Makes Everything Simple : Just forget your bagged cheese! Only turn the handle for several times and get...
- Premium Material : All parts of the rotary cheese grater are made of food grade ABS material, no BPA. The...
- Three Option Grater : The parmesan cheese grater finishes food preparation with slicing, shredding and...
Layered Cookie Storage With Wax Paper

Layered cookie storage with wax paper is an effective way to keep your Christmas cookies fresh, organized, and easy to access. By using wax paper between layers of cookies, you can prevent them from sticking together and preserve their texture and flavor. This method is perfect for those who have multiple varieties of cookies to store and want to maintain their distinct tastes.
| Ingredients | Quantity |
|---|---|
| Cookies (various types) | As needed |
| Wax paper | Several sheets, enough to layer cookies |
| Airtight container or cookie tin | 1 large container |
Cooking Steps Instructions
- Prepare Cookies for Storage: Confirm that all cookies have cooled completely after baking. This step is vital to prevent moisture from building up, which can make cookies soggy.
- Cut Wax Paper: Take sheets of wax paper and cut them into large enough sizes to cover the bottom and sides of your storage container or cookie tin. Each sheet should be about the same size as the base of the container.
- Layer the Cookies: Start by placing the first layer of cookies in the bottom of the container. Arrange them in a single layer without overlapping to make sure they maintain their shape and crunch.
- Add Wax Paper Between Layers: After placing the first layer of cookies, place a sheet of wax paper directly on top of this layer. This protective barrier will help prevent the cookies from sticking to each other.
- Continue Layering: Repeat the process with additional layers of cookies, adding a layer of wax paper between each layer until the container is filled. Be sure to alternate cookie types if you have more than one variety to keep them distinctly separated.
- Top Layer: Once you’ve reached the top of the container, add a final sheet of wax paper before closing it. This extra layer helps protect the cookies during storage.
- Seal the Container: Securely close the airtight container or cookie tin, making sure it’s sealed tightly to prevent air from entering. This step will help keep your cookies fresh and maintain their original flavor and texture.
- Store Properly: Store the container in a cool, dry place away from direct sunlight. For the best taste, consume the cookies within a few weeks, as they are freshest during this time.

- 💰 REDUCE WASTE AND SAVE MONEY: Chef Preserve keeps FOOD FRESH 5 TIMES LONGER than non-vacuum storage...
- ✅ POWERFUL, QUICK & EASY TO USE: Simply press the button to start. The device vacuum seals a bag in 5...
- ♻️ REUSABLE & RESEALABLE BAGS: Chef Preserve comes with dishwasher, freezer, refrigerator, and...
Themed Tins for Different Cookie Types

Themed tins for different cookie types is a delightful way to organize and present your festive baked goods. Each tin can represent various flavors or styles of cookies, making it easy to identify your treats while adding a charming touch to your holiday decor. Using themed tins not only keeps your cookies fresh but also beautifully showcases your baking skills and adds a personal touch to gift-giving.
| Ingredients | Quantity |
|---|---|
| Decorative tins (various themes) | As needed (1 for each type of cookie) |
| Cookies (various types) | As needed |
| Wax paper or parchment paper | Several sheets, enough for each tin |
| Gift tags or labels | As needed (1 for each tin) |
| Ribbon or string | As needed |
Cooking Steps Instructions
- Select Your Themed Tins: Choose decorative tins that correspond with the different types of cookies you’ll be storing. For example, you might use a snowy winter tin for sugar cookies, a vibrant holiday-themed tin for gingerbread, and a rustic one for chocolate chip cookies.
- Prepare Cookies for Storage: Confirm all cookies are completely cooled after baking to prevent moisture buildup that can affect their texture.
- Cut Wax or Parchment Paper: Cut sheets of wax paper or parchment paper to fit the base of each tin. This will provide a protective layer to help prevent cookies from sticking to the bottom.
- Layer the Cookies: Place a layer of cookies in the bottom of the tin, arranging them evenly and without overlap. If using different types of cookies, consider using different tins for each variety for easier identification.
- Insert Wax or Parchment Paper Between Layers: For each additional layer of cookies, place a sheet of wax or parchment paper on top before adding more cookies. This will help to maintain their shape and prevent sticking.
- Continue Layering: Repeat the layering process until the tin is filled, making sure to add wax or parchment paper between each layer of cookies.
- Seal the Tins: Once filled, securely close each decorative tin. Make sure the lids fit tightly to preserve the freshness of the cookies inside.
- Tag Your Tins: Use gift tags or labels to write the type of cookies stored inside each tin. You can also add a decorative ribbon or string around the tins for an extra festive touch.
- Store in a Cool Place: Place the tins in a cool, dry location, away from direct sunlight, to keep your cookies fresh. They are best enjoyed within a few weeks.
- Gift or Display: These themed tins make perfect gifts for friends and family during the holiday season, or you can display them as a beautiful centerpiece in your home.

- Generous Capacity: 7-quart slow cooker that comfortably serves 9+ people or fits a 7-pound roast
- Cooking Flexibility: High or low slow cooking settings, with convenient warm function for ideal serving...
- Convenient: Set it and forget it feature enables you to cook while at work or performing daily tasks
Festive Wraps and Ribbons for Holiday Cheer

Creating festive wraps and ribbons for your Christmas cookies can elevate their presentation and make them perfect for gifting or sharing during the holidays. This recipe will guide you through assembling beautiful wraps and tying delightful ribbons that add that extra special touch to your baked goods. Not only do they enhance the visual appeal, but they also convey the care and effort you put into your holiday treats.
| Ingredients | Quantity |
|---|---|
| Decorative wrapping paper | As needed (enough to wrap all your cookie tins) |
| Cellophane bags | As needed (1 for each tin or cookie assortment) |
| Ribbon (various colors) | As needed (enough to tie around each wrap) |
| Scissors | 1 |
| Gift tags or labels | As needed (1 for each wrap) |
| Tape or glue | As needed |
Cooking Steps Instructions
- Choose Your Wrapping Materials: Start by selecting decorative wrapping paper or cellophane that complements the festive theme of your cookies. Consider colors like red, green, gold, or silver for a traditional Christmas feel.
- Cut the Wrapping Paper: Measure and cut pieces of decorative wrapping paper or cellophane large enough to cover the entire tin or cookie assortment you are wrapping. Make sure there’s enough extra paper to fold over the edges, typically about 2-3 inches beyond the edges of the tin.
- Wrap the Cookie Tins: Place the tin in the center of the wrapping paper or cellophane. Fold the paper tightly around the tin, validating it is snug and secure. For cellophane, gather the edges at the top.
- Secure the Wrap: Use tape or glue to seal the edges of the wrapping paper around the tin. If using cellophane, you can continue to gather the top of the cellophane to create a pouch-like wrap.
- Prepare the Ribbon: Cut a length of ribbon long enough to wrap around the tin two or three times and have enough left to tie a bow on top. Aim for a length of approximately 24 inches for most tins.
- Tie the Ribbon: Place the ribbon underneath the wrapped tin, bring both ends up to the top, and cross them over. Securely tie a knot. Then, create a bow with the remaining ribbon, adjusting the loops to your liking.
- Add Gift Tags or Labels: Attach a gift tag or label that indicates the type of cookies inside. You can also include a heartfelt message or a recipe if desired.
- Finishing Touches: Make any adjustments to the ribbon or wrapping to validate everything looks neat and festive. You might want to fluff out the bow or trim any excess paper for a polished finish.
Now your beautifully wrapped cookies are ready to be shared, gifted, or displayed, spreading holiday cheer!

- 100% Leak-proof: Guaranteed no-spill seal and secure latches
- Crystal-clear Tritan Built: Stain-resistant and odor-resistant material for a clear view of contents
- Lightweight & Sturdy: Easy to carry, yet durable for everyday use
Airtight Sealing Techniques for Freshness

When it comes to preserving the delectable taste and texture of your Christmas cookies, using airtight sealing techniques is vital. These methods not only keep your cookies fresh for longer but also help maintain their original flavors and crunchiness. By sealing your cookies properly, you can enjoy them throughout the holiday season or make certain they’re ready to share with family and friends.
| Ingredients | Quantity |
|---|---|
| Ziplock bags or freezer-safe bags | As needed (1 for each batch of cookies) |
| Airtight cookie jars | As needed (depends on the number of cookies) |
| Vacuum sealer (optional) | 1 (for best results) |
| Wax paper or parchment paper | As needed (to separate layers of cookies) |
| Labels and markers | As needed (for dating your storage) |
Cooking Steps Instructions
1. Cool the Cookies: After baking your cookies, allow them to cool completely on a wire rack. This is vital as trapping heat inside the storage will create moisture, leading to soggy cookies.
2. Choose Your Storage Method: Decide whether you’ll use Ziplock bags, airtight cookie jars, or a vacuum sealer. Each has its advantages for different types of cookies.
3. Layer with Wax Paper: If using jars or bags, place a layer of wax paper or parchment paper in between different types of cookies. This will prevent sticking and keep the textures intact.
4. Fill the Bags/Jars: For Ziplock bags, add cookies in a single layer if possible. If your cookies are delicate, you may need to layer them with wax paper. For jars, stack them gently to avoid breakage.
5. Seal the Bags/Jars:
- For Ziplock bags: Squeeze out as much air as possible before sealing to minimize the air that can get to your cookies.
- For jars: Make sure the lid is tightly sealed to prevent any air from entering.
- For vacuum sealing: Place cookies in the vacuum bag and follow the manufacturer’s instructions to remove as much air as possible before sealing.
6. Label Your Containers: Use labels and a marker to note the type of cookies and the date they were sealed. This will help you keep track of freshness and make certain you use them within an appropriate time frame.
7. Store in a Cool, Dry Place: Place your sealed bags or jars in a cool, dry area away from direct sunlight. Avoid damp or humid areas, as moisture can spoil cookies.

- 𝗘𝗳𝗳𝗼𝗿𝘁𝗹𝗲𝘀𝘀 𝗪𝗲𝗶𝗴𝗵𝗶𝗻𝗴: Supports 5 units...
- 𝗣𝗿𝗲𝗰𝗶𝘀𝗲 𝗥𝗲𝘀𝘂𝗹𝘁𝘀: Accurately weighs up to 11 lb/5 kg with 1 g...
- 𝗦𝗶𝗺𝗽𝗹𝗲 & 𝗖𝗼𝗺𝗽𝗮𝗰𝘁: The small and sleek scale is a perfect fit for...
DIY Painted Cookie Tins

Creating personalized and beautifully decorated tins to hold your Christmas cookies is a fun and creative way to add a special touch to your holiday gifts. These DIY painted cookie tins not only serve as an attractive storage solution, but they also make unique presents for family and friends. Let’s embark on making these festive cookie tins that can be filled with your delicious baked goods.
| Ingredients | Quantity |
|---|---|
| Plain metal or cardboard tins | As needed (1 for each batch of cookies) |
| Acrylic paint | Various colors (as desired) |
| Paintbrushes | 1-2 (various sizes) |
| Painter’s tape | As needed |
| Stencils (optional) | As needed |
| Clear sealant spray | 1 can (for a protective finish) |
| Optional decorations (stickers, ribbons, etc.) | As desired |
Cooking Steps Instructions
- Prepare Your Workspace: Set up a clean workspace with newspapers or a plastic covering to protect your surfaces from paint.
- Choose Your Tins: Select plain metal or cardboard tins in various sizes to accommodate different types of cookies. Make sure they are thoroughly clean and dry before painting.
- Plan Your Design: Before you start painting, think about the designs you would like to create on the tins. You can go with festive patterns, quotes, or even simple colors. Sketched designs can also be helpful.
- Tape Off Areas: If you want to create stripes or sections of color, use painter’s tape to mask off specific areas of the tin. This will guarantee clean lines in your designs.
- Start Painting: Using your acrylic paints and brushes, begin applying the base colors to your tins. It’s best to start with lighter colors and then add darker shades for depth. Allow the first coat to dry completely before adding a second coat if needed.
- Add Decorative Elements: Once the base colors are dry, use stencils or paint free-hand designs such as snowflakes, stars, or festive motifs. Allow each layer of decoration to dry thoroughly before moving on to the next.
- Apply a Protective Finish: Once your painted designs are completely dry, spray a clear sealant over the entire tin to protect your artwork. Follow the instructions on the sealant can for the best results. Allow it to dry completely.
- Personalize Your Tins: Optionally, you can add stickers, ribbons, or other embellishments to further personalize your tins. Tie ribbons around the lids or attach gift tags for a finishing touch.
- Fill with Cookies: Once your decorated tins are ready, fill them with your freshly baked Christmas cookies. Layer cookies with wax paper to prevent them from sticking to each other.
- Seal and Gift: Place the lid on the filled tins and seal them. They are now ready to be gifted to friends and family or displayed for your holiday gatherings!

- Instant Read Food Thermometer | Our instant read thermometer features a temperature probe and advanced,...
- Multi-Use | From bbq thermometer to baking thermometer, our digital food thermometer for cooking is...
- Easy-Read Digital Thermometer For Cooking | Large instant thermometer dial with bright blue backlight...
Using Mason Jars for Mini Cookies

Using mason jars for storing mini cookies is a delightful way to present your baked treats while keeping them fresh. This method not only showcases your delicious cookies but also allows you to mix and match different flavors in individual jars, making them perfect for gifting or decorating your holiday table.
| Ingredients | Quantity |
|---|---|
| Mini cookies (such as chocolate chip, oatmeal raisin, or sugar cookies) | As needed (to fill jars) |
| Mason jars (small size) | As needed (1 for each flavor) |
| Ribbon or twine | As desired (for decoration) |
| Gift tags or labels | As needed (for personalization) |
Cooking Steps Instructions
- Bake Your Mini Cookies: Start by baking a variety of mini cookies. Use your favorite recipes or experiment with new flavors. Verify that the cookies are completely cooled before storing them in the mason jars.
- Choose Your Mason Jars: Select small-sized mason jars with tight-fitting lids to help keep the cookies fresh. Make sure the jars are clean and dry before use.
- Layer the Cookies: Begin by placing the mini cookies in the mason jars. You can layer different types of cookies in one jar to create an enticing visual effect, or keep similar cookies together in their own jars.
- Seal the Jars: Once the jars are filled, secure the lids tightly to maintain freshness. If you are layering different flavors, make sure that the more fragrant cookies are on the bottom as they could affect the taste of the others if stored directly on top.
- Decorate the Jars: To personalize your jars, use ribbons or twine to tie around the neck of each jar. Consider adding a decorative label or gift tag to indicate the contents or to write a sweet message to the recipient.
- Store or Gift: Your mason jars filled with mini cookies are now ready for gifting or enjoyment at home. Store them in a cool, dry place or gift them to friends and family as delicious holiday treats.
This simple yet charming presentation will surely impress anyone who receives them!

- Versatile 54-Piece Collection: Elevate your kitchen with the Home Hero 54-Piece Kitchen Utensil Set, a...
- Durable and Long-Lasting: Crafted from premium stainless steel, these kitchen utensils are designed to...
- Perfect Holiday Gift: Delight your loved ones with this kitchen utensils gift set this festive season....
Seasonal Labels for Easy Identification

Using seasonal labels is a practical and fun way to organize your Christmas cookie storage. By labeling your cookie jars or containers, you can easily identify the flavors and types of cookies at a glance. This method not only adds a festive touch to your storage but also saves time when you are ready to serve or gift your treats. Here’s how to create and use seasonal labels for your cookie storage.
| Ingredients | Quantity |
|---|---|
| Blank labels or sticky paper | As needed |
| Festive markers or pens | As needed |
| Decorative stickers (optional) | As desired |
| Ribbon or string (for hanging) | As desired |
Cooking Steps Instructions
- Gather Your Materials: Collect all the materials you’ll need to create your seasonal labels. This includes blank labels, decorative markers or pens, and any decorative stickers you might want to use.
- Decide on the Cookie Types: Before you start labeling, make a list of the different types of cookies you’ve baked (e.g., gingerbread, peppermint bark, sugar cookies, etc.).
- Create the Labels: Take your blank labels and write the names of each cookie type clearly. Feel free to use festive colors to match the holiday season. If you want to add a personal touch, consider adding a small drawing or doodle related to the cookie type.
- Add Decorative Elements: Personalize your labels further by using decorative stickers or designs. You can make each label unique to reflect the cookies inside or keep them uniform for a more streamlined look.
- Attach the Labels: Once your labels are complete, securely attach them to your cookie jars or storage containers. You can either stick them directly on the jars or use ribbon or string to create tags that hang from the jars.
- Organize the Storage Area: Place your labeled jars or containers in an organized manner on your storage shelves or kitchen counter. Arrange them so that similar flavors are grouped together, making it easier to find what you need.
- Celebrate and Share: Your cookie storage is now beautifully labeled and organized! When it’s time to share or serve your cookies, everyone will appreciate the clear identification of the delicious treats they can enjoy.
Using seasonal labels not only enhances the look of your cookie storage but also makes it easier for you and your guests to know what sweet delights await. Enjoy your baking and the festive spirit it brings!

- 24-ounce insulated stainless-steel water bottle with a FreeSip spout and push-button lid with lock
- Patented FreeSip spout designed for either sipping upright through the built-in straw or tilting back to...
- Protective push-to-open lid keeps spout clean; convenient carry loop doubles as a lock
Stackable Tins for Space-Saving Storage

Using stackable tins is an excellent solution for storing your Christmas cookies while saving space in your kitchen or pantry. These versatile tins can be neatly stacked on top of one another, maximizing vertical space and keeping your cookies fresh and protected. Here’s how you can effectively utilize stackable tins for your Christmas cookie storage.
| Ingredients | Quantity |
|---|---|
| Stackable cookie tins | As needed |
| Parchment paper | As needed |
| Festive ribbon (optional) | As desired |
| Labels or tags (optional) | As desired |
Cooking Steps Instructions
- Select Your Tins: Choose stackable tins that are appropriately sized for your cookies. Make sure they are airtight to keep your cookies fresh. Consider using different sizes for various types of cookies.
- Prepare the Tins: Line the bottom of each tin with parchment paper. This will help to absorb any moisture and prevent the cookies from sticking to the bottom of the tin.
- Layer Cookies: Place your cookies inside the tin in layers. Separate different types of cookies with additional parchment paper to prevent them from sticking together and preserve their flavors. For example, you might put sugar cookies on the bottom, followed by peppermint bark on the next layer.
- Secure the Lid: Once all the cookies are neatly arranged, close the lid securely to maintain freshness. Confirm that the lid fits tightly to keep air out.
- Stack the Tins: If you have multiple tins, carefully stack them on top of each other. Make sure the tins are stable and won’t topple over easily. If desired, use festive ribbon to tie them together or decorate the top tin to give a cheerful appearance.
- Label the Tins: If you choose to, add a label or tag to each tin to identify what type of cookies are inside. This is especially helpful if you’re combining several varieties in different tins.
- Store Properly: Place your stackable tins in a cool, dry place away from direct sunlight. This will help prolong the shelf life of your cookies.
Reusable Silicone Baking Mats in Tins

When it comes to baking and storing your delicious Christmas cookies, using reusable silicone baking mats can enhance your kitchen experience. These mats provide a non-stick surface for baking and can be easily rolled up and stored in your stackable tins along with your cookies. Here’s how you can incorporate silicone mats into your cookie storage system while ensuring they remain fresh and ready to enjoy.
| Ingredients | Quantity |
|---|---|
| Reusable silicone baking mats | As needed |
| Stackable cookie tins | As needed |
| Christmas cookies (baked) | As desired |
| Parchment paper | As needed |
Cooking Steps Instructions
- Prepare Your Silicone Mats: Before you start baking, make sure your reusable silicone baking mats are clean and dry. They should be laid flat on your baking sheets for maximum coverage.
- Preheat the Oven: Preheat your oven according to the cookie recipe you are using. This usually ranges from 350°F (175°C) to 375°F (190°C), depending on the type of cookie.
- Prepare Cookie Dough: Mix your cookie dough according to your favorite recipe. Once the dough is ready, use a spoon or cookie scoop to drop uniform balls of dough onto the silicone mat.
- Bake the Cookies: Place the baking sheet with the silicone mat and cookies in the preheated oven. Bake according to your recipe’s instructions, usually for about 10-12 minutes, or until the cookies are golden brown. Keep an eye on them as baking times may vary based on oven performance and cookie size.
- Cool the Cookies: Once baked, remove the baking sheet from the oven and allow it to cool for a few minutes. Using a spatula, transfer the cookies directly onto a cooling rack to cool completely.
- Prepare to Store: After your cookies are cooled, you can proceed to stack them in your stackable tins. Lay parchment paper on the bottom of each tin as an extra cushion if desired.
- Insert Silicone Mats in Tins: If you have leftover dough or want to have a fresh baking option later, you can also roll up the used silicone mats and place them in the same tin. This keeps everything together and makes it easy to grab for your next baking session.
- Layer the Cookies: When filling the tins, stack the cookies carefully. If you have multiple varieties, separate them with additional parchment paper to keep flavors intact.
- Secure the Tins: Once all items are in the tins, close them tightly. Make sure they are sealed to keep everything fresh.
- Store Properly: Place the cookie tins, with the silicone mats inside if necessary, into a cool, dry place. Keeping them away from sunlight will help maintain the freshness of the cookies.
Now, you have not only stored your Christmas cookies efficiently but also made sure everything is ready for your future baking adventures, thanks to the reusable silicone mats stored neatly in the same tins!