
Classic Sugar Cookies

Classic sugar cookies are a delightful treat perfect for the holiday season. Their sweet, buttery flavor and light texture make them a favorite among many, especially when decorated with colorful icing and sprinkles. These cookies are simple to make and can be shaped into various festive designs, making them a wonderful addition to any Christmas celebration.
| Ingredient | Quantity |
|---|---|
| All-purpose flour | 2 ¾ cups |
| Baking powder | 1 teaspoon |
| Salt | ¼ teaspoon |
| Unsalted butter | 1 cup (2 sticks) |
| Granulated sugar | 1 ½ cups |
| Egg | 1 large |
| Vanilla extract | 1 teaspoon |
| Almond extract (optional) | ½ teaspoon |
Instructions:
- Preheat the Oven: Begin by preheating your oven to 350°F (175°C). This guarantees that the cookies bake evenly and become nicely golden.
- Mix Dry Ingredients: In a medium bowl, whisk together the all-purpose flour, baking powder, and salt. Set this mixture aside as it will be added to the wet ingredients later on.
- Cream Butter and Sugar: In a large mixing bowl, use an electric mixer to beat the unsalted butter and granulated sugar together until the mixture is light and fluffy. This should take about 3-4 minutes.
- Add Eggs and Extracts: To the butter-sugar mixture, add the egg, vanilla extract, and almond extract. Continue to beat everything together until well combined.
- Combine Wet and Dry Ingredients: Gradually add the dry ingredients to the wet mixture, mixing at low speed until just combined. Be careful not to overmix, as this could lead to tougher cookies.
- Chill the Dough: Once the dough is well combined, cover it with plastic wrap and refrigerate for at least 30 minutes. Chilling the dough helps it retain its shape while baking.
- Roll Out the Dough: After chilling, dust a clean surface with flour. Roll out the dough to about ¼-inch thickness. Use cookie cutters to cut out shapes as desired.
- Place on Baking Sheets: Arrange the cut cookies on ungreased baking sheets, leaving space between each cookie to allow for spreading.
- Bake the Cookies: Place the cookie sheets in the preheated oven and bake for 8-10 minutes, or until the edges are lightly golden. Keep an eye on them, as baking times may vary.
- Cool the Cookies: Once baked, remove the cookies from the oven and allow them to cool on the baking sheets for about 5 minutes. Transfer them to wire racks to cool completely.
- Decorate: Once the cookies are completely cooled, feel free to decorate them with icing, sprinkles, or any toppings you enjoy.
Enjoy your classic sugar cookies during the festive season or share them with friends and family!
Gingerbread Men

Gingerbread men are classic festive cookies that are spiced to perfection, offering a warm and comforting flavor that captures the essence of the holiday season. These cookies are fun to make and decorate, often adorned with icing and candy to create adorable, edible characters. Perfect for sharing, they bring joy to both bakers and eaters alike.
| Ingredient | Quantity |
|---|---|
| All-purpose flour | 3 cups |
| Ground ginger | 1 tablespoon |
| Ground cinnamon | 1 tablespoon |
| Ground nutmeg | ½ teaspoon |
| Baking soda | 1 teaspoon |
| Salt | ½ teaspoon |
| Unsalted butter | ¾ cup (1 ½ sticks) |
| Brown sugar | ¾ cup packed |
| Molasses | ½ cup |
| Egg | 1 large |
| Vanilla extract | 1 teaspoon |
Instructions:
- Preheat the Oven: Begin by preheating your oven to 350°F (175°C) to prepare for baking.
- Mix Dry Ingredients: In a large bowl, combine the all-purpose flour, ground ginger, ground cinnamon, ground nutmeg, baking soda, and salt. Whisk these dry ingredients together until evenly mixed.
- Cream Butter and Sugar: In another bowl, use an electric mixer to cream together the unsalted butter and brown sugar until the mixture is smooth and fluffy, about 3-4 minutes.
- Incorporate Molasses and Egg: To the creamed mixture, add the molasses, egg, and vanilla extract. Mix until everything is well combined.
- Combine Mixtures: Gradually add the dry ingredient mixture to the wet ingredients, mixing on low speed until just combined. Be careful not to overmix to keep the cookies tender.
- Chill the Dough: Cover the dough tightly with plastic wrap and refrigerate it for at least 30 minutes. Chilling will help the cookies maintain their shape while baking.
- Roll Out the Dough: On a lightly floured surface, roll out the chilled dough to about ¼-inch thickness. Use gingerbread men cookie cutters to cut out shapes.
- Place on Baking Sheets: Arrange the cut-out dough on ungreased baking sheets, ensuring there is enough space between each cookie to allow for baking.
- Bake the Cookies: Place the baking sheets in the oven and bake cookies for 8-10 minutes, until the edges are set and slightly firm. Keep an eye on them, as baking times can vary.
- Cool the Cookies: Once out of the oven, let the gingerbread men cool on the baking sheets for a few minutes before transferring them to a wire rack to cool completely.
- Decorate (Optional): Once cooled, feel free to decorate each cookie with icing, sprinkles, or candy to bring your gingerbread men to life!
Almond Shortbread Stars

Almond shortbread stars are delightful, buttery cookies that melt in your mouth, offering a rich almond flavor enhanced by a hint of vanilla. These festive treats are perfect for holiday gatherings and make beautiful additions to any cookie platter. Their elegant star shape is ideal for decorating or serving plain, and they are sure to please both friends and family alike.
| Ingredient | Quantity |
|---|---|
| All-purpose flour | 2 cups |
| Unsalted butter | 1 cup (2 sticks) |
| Powdered sugar | ½ cup |
| Ground almonds | 1 cup |
| Vanilla extract | 1 teaspoon |
| Almond extract | ½ teaspoon |
| Salt | ¼ teaspoon |
| Slivered almonds (optional) | for garnish |
Instructions:
- Preheat the Oven: Start by preheating your oven to 350°F (175°C). This will guarantee that the cookies bake evenly.
- Prepare Baking Sheets: Line two baking sheets with parchment paper, which will prevent the cookies from sticking and help them bake evenly.
- Cream Butter and Sugar: In a large mixing bowl, use an electric mixer to cream together the unsalted butter and powdered sugar until the mixture is light and fluffy, approximately 3-4 minutes.
- Add Extracts: Once the butter and sugar are well combined, add the vanilla extract, almond extract, and salt. Mix until fully incorporated.
- Incorporate Almonds and Flour: Gradually add in the ground almonds and all-purpose flour. Mix on low speed until the dough begins to come together, being careful not to overmix.
- Form the Dough: Once the dough is combined, it should be soft yet firm enough to hold its shape. If necessary, you can chill the dough in the refrigerator for around 15-20 minutes to help it firm up further.
- Roll Out the Dough: Sprinkle a little flour on a clean surface. Roll out the dough to about ¼-inch thickness. Use a star-shaped cookie cutter to cut out shapes.
- Place on Baking Sheets: Transfer the star-shaped cookies onto the prepared baking sheets, leaving some space between each cookie for them to bake.
- Garnish (optional): If desired, sprinkle slivered almonds on top of the cookies before baking for added texture and appearance.
- Bake the Cookies: Bake in the preheated oven for about 10-12 minutes or until the edges are lightly golden. Avoid overbaking as you want them to stay tender.
- Cool the Cookies: Remove the baking sheets from the oven and allow the cookies to cool on the sheets for about 5 minutes before transferring them to a wire rack to cool completely.
Enjoy decorating or serving these almond shortbread stars, and share them with loved ones this holiday season!
Royal Icing Decorated Trees

Royal icing decorated trees are a charming and festive way to celebrate the holiday season. These cookies are shaped like Christmas trees and adorned with colorful royal icing, making them a perfect treat for gift-giving, holiday parties, or simply to decorate your home. Their delightful designs can be customized with various colors and patterns, making each cookie a unique masterpiece!
| Ingredient | Quantity |
|---|---|
| All-purpose flour | 3 cups |
| Unsalted butter | 1 cup (2 sticks) |
| Granulated sugar | 1 cup |
| Egg | 1 large |
| Vanilla extract | 1 teaspoon |
| Baking powder | 1 teaspoon |
| Salt | ½ teaspoon |
| Royal icing (prepared) | 2-3 cups |
| Food coloring (optional) | Various colors |
| Sprinkles (optional) | For decoration |
Instructions:
- Preheat the Oven: Begin by preheating your oven to 350°F (175°C) to guarantee it’s hot enough to perfectly bake the cookies.
- Prepare Baking Sheets: Line two baking sheets with parchment paper to prevent sticking and allow for even baking.
- Cream Butter and Sugar: In a large mixing bowl, use an electric mixer to cream the unsalted butter and granulated sugar until the mixture is light and fluffy, about 3-4 minutes.
- Add Egg and Vanilla: Add the egg and vanilla extract to the creamed mixture and beat until thoroughly combined.
- Mix Dry Ingredients: In a separate bowl, whisk together the all-purpose flour, baking powder, and salt to confirm they are evenly mixed.
- Combine Mixtures: Gradually add the dry ingredient mixture to the wet ingredients, mixing on low speed until the dough comes together. Be careful not to overmix.
- Chill the Dough: If the dough is too soft, chill it in the refrigerator for about 30 minutes. This will make it easier to roll out.
- Roll Out the Dough: On a lightly floured surface, roll out the dough to about ¼-inch thick.
- Cut Out Tree Shapes: Use a Christmas tree-shaped cookie cutter to cut out shapes from the rolled dough, and place them on the prepared baking sheets.
- Bake the Cookies: Bake in the preheated oven for 8-10 minutes or until the edges are lightly golden. Keep an eye on them to avoid overbaking.
- Cool the Cookies: Remove the baking sheets from the oven and allow the cookies to cool on the sheets for about 5 minutes before transferring them to a wire rack to cool completely.
- Prepare Royal Icing: If you haven’t done so already, prepare the royal icing according to your recipe or package instructions. Divide it into different bowls and tint with your desired food coloring.
- Decorate the Cookies: Once the cookies are completely cooled, use piping bags or icing spatulas to decorate them with royal icing. Get creative! You can pipe intricate designs, outlines, or simple lines to represent garlands on the trees.
- Add Sprinkles: While the icing is still wet, add sprinkles or other decorations as desired.
- Allow to Dry: Let the decorated cookies sit at room temperature for a few hours or until the icing has fully dried and hardened.
Your royal icing decorated trees are now ready to be presented and enjoyed!
Peppermint Swirl Cookies

Peppermint swirl cookies are a delightful and festive treat that capture the essence of the holiday season with their revitalizing mint flavor and eye-catching appearance. These soft and chewy cookies are swirled with vibrant red and white dough, making them as enjoyable to look at as they are to eat. Perfect for holiday parties, cookie exchanges, or a sweet homemade gift, peppermint swirl cookies are sure to be a hit with everyone!
| Ingredient | Quantity |
|---|---|
| All-purpose flour | 2 ¾ cups |
| Unsalted butter | 1 cup (2 sticks) |
| Granulated sugar | 1 cup |
| Powdered sugar | ½ cup |
| Egg | 1 large |
| Vanilla extract | 1 teaspoon |
| Peppermint extract | 1 teaspoon |
| Baking powder | 1 teaspoon |
| Salt | ½ teaspoon |
| Red food coloring | As needed |
| Additional granulated sugar | For rolling cookies |
Instructions:
- Preheat the Oven: Start by preheating your oven to 350°F (175°C) so it’s ready for baking once your cookies are shaped.
- Prepare Baking Sheets: Line two baking sheets with parchment paper to prevent sticking and allow for easy removal of the cookies once baked.
- Cream Butter and Sugars: In a large bowl, cream together the unsalted butter, granulated sugar, and powdered sugar using an electric mixer until the mixture is light and fluffy, about 3-4 minutes.
- Incorporate Egg and Extracts: Add the egg, vanilla extract, and peppermint extract to the butter-sugar mixture, and beat until fully incorporated.
- Mix Dry Ingredients: In a separate bowl, whisk together the all-purpose flour, baking powder, and salt until combined.
- Combine Wet and Dry Mixtures: Gradually add the dry ingredient mixture to the wet mixture, stirring until a coherent dough forms. Be careful not to overmix.
- Separate and Color Dough: Divide the dough into two equal portions. In one half, incorporate the red food coloring until you achieve a vibrant red hue. The other half will remain plain (white).
- Roll Out the Dough: On a lightly floured surface, roll out both the red and white dough into rectangles, approximately ¼-inch thick.
- Layer and Roll: Place the white dough on top of the red dough. Starting from one edge, roll the dough tightly into a log. Be sure to keep the layers as tight as possible for a defined swirl.
- Chill the Dough: Wrap the log of dough in plastic wrap and chill in the refrigerator for about 30 minutes to firm it up.
- Slice the Cookies: Once chilled, remove the dough log from the refrigerator and slice it into ¼-inch thick rounds.
- Prepare for Baking: Roll each cookie round in granulated sugar to coat them lightly before placing them on the prepared baking sheets.
- Bake: Bake in the preheated oven for 10-12 minutes, or until the edges are set but the centers are slightly soft.
- Cool the Cookies: Remove the cookies from the oven and let them cool on the baking sheets for 5 minutes before transferring them to wire racks to cool completely.
- Serve and Enjoy: Once cooled, serve these festive peppermint swirl cookies at your holiday gatherings or pack them up as special gifts for friends and family. Enjoy the holiday spirit in every bite!
Chocolate Cut-Out Cookies

Chocolate cut-out cookies are a rich and decadent treat that adds a delightful twist to traditional holiday cookies. With their deep chocolate flavor and versatility, these cookies can be cut into festive shapes and decorated with icing or sprinkles, making them perfect for cookie exchanges, holiday parties, or simply indulging at home. Enjoy the deliciousness of chocolate in every bite with these easy-to-make cut-out cookies!
| Ingredient | Quantity |
|---|---|
| All-purpose flour | 2 ¾ cups |
| Unsweetened cocoa powder | ¾ cup |
| Granulated sugar | 1 cup |
| Brown sugar | ½ cup |
| Unsalted butter (softened) | 1 cup (2 sticks) |
| Egg | 1 large |
| Vanilla extract | 1 teaspoon |
| Baking powder | 1 teaspoon |
| Baking soda | ½ teaspoon |
| Salt | ½ teaspoon |
| Powdered sugar | For decorating |
Instructions:
- Preheat the Oven: Begin by preheating your oven to 350°F (175°C). This guarantees it’s ready for your cookies once they are shaped.
- Prepare Baking Sheets: Line a couple of baking sheets with parchment paper to facilitate easy removal of the cookies after baking.
- Mix Dry Ingredients: In a medium bowl, whisk together the all-purpose flour, unsweetened cocoa powder, baking powder, baking soda, and salt until well combined.
- Cream Butter and Sugars: In a large mixing bowl, beat the softened unsalted butter, granulated sugar, and brown sugar with an electric mixer on medium speed until the mixture is smooth and fluffy, which should take about 3-4 minutes.
- Add Wet Ingredients: Add the egg and vanilla extract to the butter-sugar mixture, then beat until thoroughly combined.
- Combine Mixtures: Gradually add the dry ingredient mixture to the wet mixture, stirring with a spatula or wooden spoon until a dough forms. Be careful not to overmix.
- Chill the Dough: Divide the dough in half and wrap each portion in plastic wrap. Chill in the refrigerator for at least 1 hour to firm up.
- Roll Out the Dough: On a lightly floured surface, take one portion of dough and roll it out to about ¼ inch thick. Use additional flour as needed to prevent sticking.
- Cut Out Shapes: Use cookie cutters to cut out shapes from the rolled-out dough. Place them carefully on the prepared baking sheets, spacing them about 2 inches apart.
- Bake the Cookies: Bake in the preheated oven for 8-10 minutes or until the edges are firm. Keep an eye on them to avoid overbaking.
- Cool Cookies: Allow the cookies to cool on the sheets for about 5 minutes before transferring them to wire racks to cool completely.
- Decorate (Optional): Once completely cool, you can decorate your chocolate cut-out cookies with icing or sprinkle powdered sugar on top for a festive touch. Enjoy your delicious creations!
Vanilla Bean Sandwich Cookies

Vanilla Bean Sandwich Cookies are a delightful and elegant treat that captures the essence of vanilla in every bite. These soft, buttery cookies are sandwiched together with a creamy vanilla filling, making them perfect for sharing during the holiday season or as a special dessert any time of the year. The subtle sweetness and rich flavor are sure to satisfy anyone who tries them!
| Ingredient | Quantity |
|---|---|
| All-purpose flour | 2 cups |
| Granulated sugar | ¾ cup |
| Unsalted butter (softened) | 1 cup (2 sticks) |
| Egg | 1 large |
| Vanilla bean (scraped) | 1 |
| Baking powder | 1 teaspoon |
| Salt | ½ teaspoon |
| Powdered sugar (for filling) | 2 cups |
| Heavy cream | ½ cup |
| Vanilla extract | 1 teaspoon |
Instructions:
- Preheat the Oven: Preheat your oven to 350°F (175°C). This guarantees it is hot enough for baking once your cookie dough is ready.
- Prepare Baking Sheets: Line two baking sheets with parchment paper for easy cookie removal after baking.
- Cream Butter and Sugar: In a large mixing bowl, beat the softened unsalted butter and granulated sugar together using an electric mixer on medium speed until the mixture is light and fluffy, about 3-4 minutes.
- Add Egg and Vanilla Bean: Add the egg and the scraped seeds from the vanilla bean to the butter-sugar mixture. Beat until fully incorporated.
- Mix Dry Ingredients: In a separate bowl, whisk together the all-purpose flour, baking powder, and salt until combined.
- Combine Mixtures: Gradually add the dry mixture to the wet mixture, beating on low speed until a soft dough forms. Do not overmix.
- Shape the Cookies: Using a tablespoon or cookie scoop, drop dough balls onto the prepared baking sheets, spacing them about 2 inches apart to allow for spreading during baking.
- Bake: Bake in the preheated oven for 10-12 minutes or until the edges are lightly golden. The centers may look slightly underbaked, but they will firm up as they cool.
- Cool the Cookies: Remove the baking sheets from the oven and allow the cookies to cool on the sheets for about 5 minutes before transferring them to wire racks to cool completely.
- Prepare the Filling: In a mixing bowl, whisk together the powdered sugar, heavy cream, and vanilla extract until smooth and creamy to create the filling.
- Assemble Cookies: Once the cookies are completely cool, spread a generous amount of filling on the flat side of one cookie, then top with another cookie, pressing gently together to form a sandwich.
- Serve and Enjoy: Your vanilla bean sandwich cookies are now ready to be enjoyed! Store any leftovers in an airtight container.
Eggnog Spice Cookies

Eggnog Spice Cookies are a festive and flavorful treat that encapsulates the essence of holiday cheer. Infused with the aromatic spices and rich flavor of eggnog, these cookies are perfect for sharing at holiday gatherings or enjoying with a warm cup of tea or coffee. Their soft, chewy texture and spiced flavor make them a delightful addition to any Christmas cookie platter.
| Ingredient | Quantity |
|---|---|
| All-purpose flour | 2 ½ cups |
| Ground nutmeg | 1 teaspoon |
| Ground cinnamon | 1 teaspoon |
| Ground ginger | ½ teaspoon |
| Baking soda | 1 teaspoon |
| Salt | ½ teaspoon |
| Unsalted butter (softened) | ¾ cup (1.5 sticks) |
| Granulated sugar | 1 cup |
| Brown sugar (packed) | ½ cup |
| Egg | 1 large |
| Eggnog | ½ cup |
| Vanilla extract | 1 teaspoon |
| Powdered sugar (for icing) | 1 cup |
| Milk | 1 tablespoon |
Instructions:
- Preheat the Oven: Start by preheating your oven to 350°F (175°C) to guarantee it reaches the desired temperature by the time your cookie dough is ready.
- Prepare Baking Sheets: Line two baking sheets with parchment paper to prevent the cookies from sticking and to make cleanup easier.
- Mix Dry Ingredients: In a medium bowl, whisk together the all-purpose flour, ground nutmeg, ground cinnamon, ground ginger, baking soda, and salt until combined. Set this mixture aside.
- Cream Butter and Sugars: In a large mixing bowl, use an electric mixer to cream together the softened unsalted butter, granulated sugar, and brown sugar on medium speed until the mixture is smooth and fluffy, about 3-4 minutes.
- Add Egg and Liquid Ingredients: Beat in the egg, eggnog, and vanilla extract to the butter-sugar mixture until well blended.
- Combine Mixtures: Gradually add the dry mixture to the wet mixture, mixing on low speed until just combined. Be careful not to overmix; stop once you no longer see dry flour.
- Shape the Cookies: Using a tablespoon or cookie scoop, drop dough balls onto the prepared baking sheets, leaving about 2 inches of space between each ball to allow for spreading.
- Bake: Place the baking sheets in the preheated oven and bake for 10-12 minutes, or until the edges are lightly golden and the centers appear set. The cookies will firm up as they cool.
- Cool the Cookies: After baking, remove the cookies from the oven and let them cool on the baking sheets for about 5 minutes before transferring them to wire racks to cool completely.
- Prepare Icing: In a small bowl, whisk together the powdered sugar and milk until smooth. Drizzle the icing over the cooled cookies using a spoon or a piping bag for a decorative touch.
Enjoy your delicious Eggnog Spice Cookies as part of your holiday festivities!
Cranberry Orange Christmas Cookies

Cranberry Orange Christmas Cookies are a delightful and invigorating addition to your holiday baking repertoire. Combining the tartness of dried cranberries with the zesty brightness of orange, these cookies are soft and chewy with a hint of citrus flavor. They are perfect for sharing at festive gatherings or enjoying as a sweet treat with your favorite holiday beverages.
| Ingredient | Quantity |
|---|---|
| All-purpose flour | 2 cups |
| Baking soda | 1 teaspoon |
| Salt | ½ teaspoon |
| Unsalted butter (softened) | ¾ cup (1.5 sticks) |
| Granulated sugar | 1 cup |
| Brown sugar (packed) | ½ cup |
| Egg | 1 large |
| Zest of 1 orange | 1 tablespoon |
| Orange juice | 2 tablespoons |
| Dried cranberries (chopped) | 1 cup |
| Powdered sugar (for icing) | 1 cup |
| Milk | 2 tablespoons |
Instructions:
- Preheat the Oven: Begin by preheating your oven to 350°F (175°C), ensuring it’s ready for baking once your cookie dough is prepared.
- Prepare Baking Sheets: Line two baking sheets with parchment paper to prevent the cookies from sticking and allow for easy cleanup after baking.
- Mix Dry Ingredients: In a medium bowl, whisk together the all-purpose flour, baking soda, and salt until well combined. Set this mixture aside for later use.
- Cream Butter and Sugars: In a large mixing bowl, cream together the softened unsalted butter, granulated sugar, and brown sugar using an electric mixer on medium speed. Beat until the mixture is light and fluffy, approximately 3-4 minutes.
- Add Egg and Flavorings: Add the egg, orange zest, and orange juice to the creamed butter mixture. Mix well, blending everything until the ingredients are fully combined and smooth.
- Combine Mixtures: Gradually add the dry ingredient mixture to the wet ingredients, mixing on low speed until just combined. Take care not to overmix the dough.
- Incorporate Cranberries: Stir in the chopped dried cranberries using a spatula or wooden spoon until they are evenly distributed throughout the dough.
- Shape the Cookies: Use a tablespoon or cookie scoop to drop rounded dough balls onto the prepared baking sheets. Leave about 2 inches of space between each ball to allow the cookies room to spread during baking.
- Bake: Place the baking sheets in the preheated oven and bake for 10-12 minutes. The edges should be lightly golden, while the centers will look a bit underbaked.
- Cool the Cookies: Once baked, remove the cookies from the oven and allow them to cool on the baking sheets for about 5 minutes before transferring them to wire racks to cool completely.
- Prepare Icing (Optional): For icing, whisk together the powdered sugar and milk until smooth and adjust the consistency as needed. Drizzle the icing over the cooled cookies before serving. Enjoy your fresh Cranberry Orange Christmas Cookies!
Nutty Snowflake Cookies
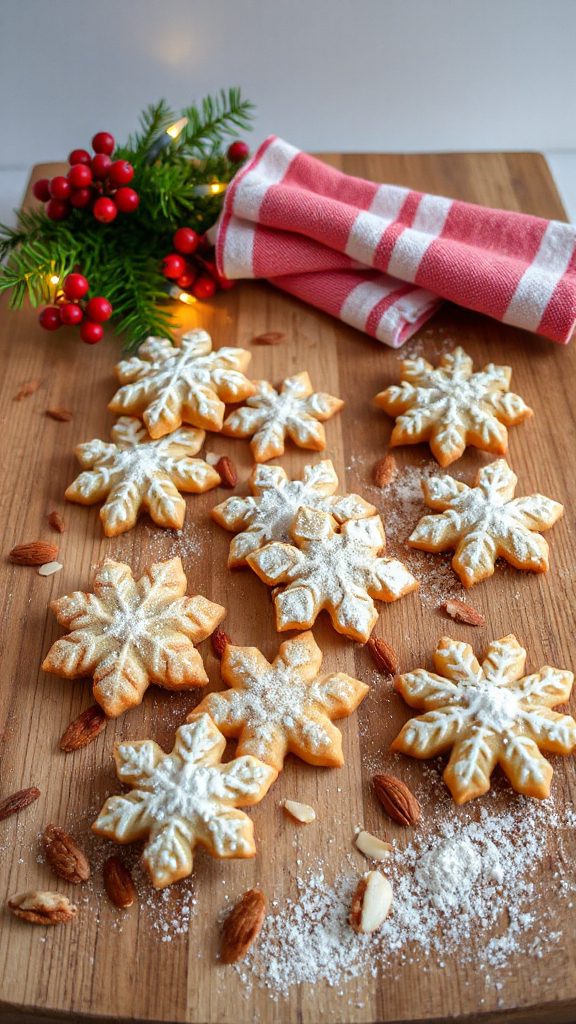
Nutty Snowflake Cookies are a delightful addition to your holiday cookie platter. These cookies are buttery and rich, with a wonderful nutty flavor that comes from finely chopped nuts, creating a delightful texture. They are often shaped like snowflakes, making them a perfect festive treat for the holiday season. Dust them with powdered sugar for a snowy finish, and they’ll be a hit at any gathering!
| Ingredient | Quantity |
|---|---|
| All-purpose flour | 2 cups |
| Unsalted butter | 1 cup (2 sticks) |
| Granulated sugar | ½ cup |
| Brown sugar (packed) | ½ cup |
| Egg | 1 large |
| Vanilla extract | 1 teaspoon |
| Chopped nuts (walnuts or pecans) | 1 cup |
| Salt | ½ teaspoon |
| Powdered sugar (for dusting) | optional |
Instructions:
- Preheat the Oven: Preheat your oven to 350°F (175°C) to guarantee it’s hot and ready for baking your cookies.
- Prepare Baking Sheets: Line two baking sheets with parchment paper to prevent the cookies from sticking and facilitate easy cleanup.
- Cream Butter and Sugars: In a large mixing bowl, beat the softened unsalted butter, granulated sugar, and brown sugar together using an electric mixer on medium speed. Continue mixing until the mixture is light and fluffy, about 3-4 minutes.
- Add Egg and Vanilla: Crack the egg into the bowl and add the vanilla extract. Mix again until the egg and vanilla are fully incorporated into the butter mixture.
- Mix Dry Ingredients: In a separate bowl, whisk together the all-purpose flour, chopped nuts, and salt until combined.
- Combine Mixtures: Gradually add the dry mixture to the wet ingredients. Mix on low speed until just combined to avoid overworking the dough. The dough should be soft and slightly sticky.
- Shape the Cookies: Using your hands, scoop portions of dough and roll them into balls about 1 inch in diameter. Place them on the prepared baking sheets, spacing them about 2 inches apart.
- Bake: Place the baking sheets in the preheated oven and bake for 10-12 minutes, or until the edges are lightly golden.
- Cool: Remove the cookies from the oven and allow them to cool on the baking sheets for about 5 minutes before transferring them to wire racks to cool completely.
- Dust with Powdered Sugar: Once the cookies have cooled, sprinkle them with powdered sugar for a snowy touch. Serve and enjoy your Nutty Snowflake Cookies!
Piped Butter Cookies

Piped Butter Cookies are a classic holiday treat that brings both elegance and deliciousness to your festive gatherings. These cookies are characterized by their rich buttery flavor and tender crumb, crafted using a piping bag to create beautiful shapes and designs. Perfect for decorating with icing or sprinkles, these cookies are guaranteed to impress your guests and become a beloved staple on your holiday cookie tray.
| Ingredient | Quantity |
|---|---|
| All-purpose flour | 2 cups |
| Unsalted butter (softened) | 1 cup (2 sticks) |
| Granulated sugar | ¾ cup |
| Egg | 1 large |
| Vanilla extract | 1 teaspoon |
| Baking powder | 1 teaspoon |
| Salt | ½ teaspoon |
| Powdered sugar (for dusting) | optional |
Instructions:
- Preheat the Oven: Begin by preheating your oven to 350°F (175°C). This is crucial for achieving the perfect texture for your cookies.
- Prepare Baking Sheets: Line two baking sheets with parchment paper to guarantee that the cookies do not stick and to make cleanup hassle-free.
- Cream Butter and Sugar: In a large mixing bowl, beat the softened unsalted butter and granulated sugar together using an electric mixer on medium speed. Mix until the mixture is light and fluffy, which should take about 3-4 minutes.
- Incorporate Egg and Vanilla: Crack the egg into the butter-sugar mixture and add the vanilla extract. Continue mixing until both are thoroughly combined.
- Combine Dry Ingredients: In a separate bowl, whisk together the all-purpose flour, baking powder, and salt. This will guarantee the cookies rise properly and have good flavor.
- Mix Dry and Wet Ingredients: Gradually add the dry ingredients to the wet mixture while mixing on low speed. Beat until just combined, being careful not to overmix.
- Prepare Piping Bag: Transfer the cookie dough to a piping bag fitted with a star or round nozzle, depending on the shape you desire for the cookies.
- Pipe Cookies: Gently squeeze the piping bag to form cookies on the prepared baking sheets, leaving space of about 2 inches between each cookie to allow for spreading.
- Bake: Place the baking sheets in the preheated oven and bake for 10-12 minutes, until the edges are lightly golden but the centers remain soft.
- Cool: After baking, remove the cookies from the oven and let them cool on the baking sheets for about 5 minutes before transferring them to wire racks to cool completely.
- Dust with Powdered Sugar: If desired, sprinkle the cooled cookies with powdered sugar for an extra festive touch. Serve and enjoy!
Festive Spritz Cookies

Festive Spritz Cookies are a delightful holiday treat that not only taste delicious but also bring a burst of color and creativity to your cookie platter. These buttery, melt-in-your-mouth cookies are made using a cookie press, which allows for fun shapes and designs, making them perfect for festive occasions. Often adorned with festive sprinkles or colored sugars, Spritz Cookies are both a joy to make and to eat during the holiday season.
| Ingredient | Quantity |
|---|---|
| All-purpose flour | 2 cups |
| Unsalted butter (softened) | 1 cup (2 sticks) |
| Granulated sugar | ¾ cup |
| Egg | 1 large |
| Vanilla extract | 1 teaspoon |
| Almond extract | ½ teaspoon |
| Baking powder | 1 teaspoon |
| Salt | ¼ teaspoon |
| Colored sprinkles (for decoration) | optional |
Instructions:
- Preheat the Oven: Begin by preheating your oven to 375°F (190°C). This step guarantees that the cookies bake evenly and turn out perfectly.
- Prepare Baking Sheets: Line two baking sheets with parchment paper or silicone baking mats to prevent the cookies from sticking during baking.
- Cream Butter and Sugar: In a mixing bowl, use an electric mixer to cream the softened unsalted butter and granulated sugar together on medium speed. Mix until the combination becomes light and fluffy, about 3-4 minutes.
- Add Egg and Extracts: Crack the egg into the mixture along with the vanilla and almond extracts. Beat the mixture on low speed until all ingredients are well blended.
- Mix Dry Ingredients: In a separate bowl, whisk together the all-purpose flour, baking powder, and salt. This guarantees that the leavening agent is distributed evenly throughout the flour.
- Combine Ingredients: Gradually add the dry ingredient mixture to the wet mixture while continuing to mix on low speed. Stop mixing as soon as the dough comes together to avoid overmixing, which can lead to tough cookies.
- Fill Cookie Press: If using a cookie press, load the dough into the press according to the manufacturer’s directions. Choose your desired shape disc to create fun designs.
- Press Cookies onto Baking Sheets: Press the dough onto the lined baking sheets, spacing the cookies about 1 inch apart. You can sprinkle colored sugars or sprinkles on top of each cookie as desired before baking.
- Bake: Place the baking sheets in the preheated oven and bake for 8-10 minutes. The cookies should be lightly golden around the edges, and the centers should remain soft.
- Cool: Once baked, remove the cookies from the oven and let them cool on the baking sheets for a few minutes before transferring them to wire racks to cool completely. Enjoy your festive Spritz Cookies with family and friends!
Meringue-Topped Cookie Cups

Meringue-Topped Cookie Cups are a delightful combination of a crunchy cookie base and a light, fluffy meringue topping. These little desserts are perfect for holiday gatherings or any festive occasion, offering a beautiful presentation and a delightful contrast of textures. The cookie cups can be filled with your choice of flavored fillings, such as fruit curd or chocolate ganache, before being crowned with the sweet meringue topping.
| Ingredient | Quantity |
|---|---|
| All-purpose flour | 1 cup |
| Unsalted butter (softened) | ½ cup (1 stick) |
| Granulated sugar | ½ cup |
| Powdered sugar | 1 cup |
| Egg yolks | 2 large |
| Vanilla extract | 1 teaspoon |
| Baking powder | ½ teaspoon |
| Salt | ¼ teaspoon |
| Egg whites | 2 large |
| Cream of tartar | ¼ teaspoon |
| Filling of choice (fruit curd/chocolate ganache) | optional |
Instructions:
- Preheat the Oven: Start by preheating your oven to 350°F (175°C). This guarantees that your cookie cups will bake evenly.
- Prepare Baking Sheet: Line a muffin tin with paper liners or grease it lightly to prevent sticking.
- Make Cookie Dough: In a mixing bowl, cream together the softened unsalted butter and granulated sugar until the mixture is light and fluffy, about 3-4 minutes.
- Add Egg Yolks and Flavoring: Mix in the egg yolks and vanilla extract until well combined.
- Combine Dry Ingredients: In a separate bowl, whisk together the all-purpose flour, baking powder, and salt. Gradually add this dry mixture to the wet mixture, mixing just until combined.
- Fill Muffin Tin: Spoon the cookie dough into the prepared muffin tin, filling each cup about halfway.
- Bake Cookie Cups: Bake in the preheated oven for about 12-15 minutes, or until the edges are lightly golden. Remove from the oven and allow to cool slightly.
- Make Meringue Topping: While the cookie cups are cooling, prepare the meringue. In a clean and dry mixing bowl, beat the egg whites on medium speed until foamy. Add in the cream of tartar and continue beating until soft peaks form.
- Add Powdered Sugar: Gradually add the powdered sugar, a couple of tablespoons at a time, continuing to beat until the meringue forms stiff peaks and is glossy.
- Fill Cookie Cups: Once the cookie cups have cooled, fill each cup with your desired filling (fruit curd or chocolate ganache).
- Top with Meringue: Use a piping bag or a spoon to dollop or pipe the meringue on top of the filling in each cookie cup.
- Brown the Meringue: To create a beautiful toasted effect, you can use a kitchen torch to carefully brown the meringue, or you can pop the filled cookie cups under the broiler for a minute or two, keeping a close eye to prevent burning.
- Serve: Allow the meringue-topped cookie cups to cool slightly before serving. Enjoy these delightful treats with family and friends!