Easter whoopie pies bring joy and creativity to festive celebrations. Kids love Bunny Whoopie Pies shaped like cute bunny faces and Colorful Easter Egg Whoopie Pies that mimic vibrant eggs. Spring Flower Whoopie Pies add a seasonal touch, while Chickadee Whoopie Pies feature chocolate and marshmallow goodness. Other fun options include Carrot Patch pies and Sprinkle-topped treats bursting with color. These designs capture the essence of Easter, making them a favorite among children, and more exciting ideas await exploration.
Bunny Whoopie Pies

Bunny Whoopie Pies are a delightful Easter treat that combines soft, cake-like cookies with a sweet and fluffy filling, shaped to resemble adorable bunny faces.
These whimsical desserts are perfect for kids and adults alike, adding a touch of fun to any Easter celebration. With a preparation time of about 30 minutes and a baking time of 15 minutes, they are a quick and easy way to impress guests or surprise little ones with a festive treat.
Ingredients:
- 1 cup all-purpose flour
- 1/2 cup cocoa powder
- 1 teaspoon baking powder
- 1/2 teaspoon baking soda
- 1/4 teaspoon salt
- 1/2 cup unsalted butter, softened
- 1 cup granulated sugar
- 1 large egg
- 1 teaspoon vanilla extract
- 1/2 cup milk
- 1 cup powdered sugar
- 1/4 cup unsweetened whipped cream
- Pink and white candy melts or chocolate for decoration
- Edible eyes (optional)
- Mini marshmallows (for bunny tails)
Cooking Instructions:
- Preheat the Oven: Preheat your oven to 350°F (175°C) and line a baking sheet with parchment paper.
- Combine Dry Ingredients: In a medium bowl, whisk together the flour, cocoa powder, baking powder, baking soda, and salt until well combined.
- Mix Butter and Sugar: In a large mixing bowl, cream together the softened butter and granulated sugar until light and fluffy. This should take about 3 minutes.
- Add Egg and Vanilla: Beat in the egg and vanilla extract until well mixed.
- Combine Wet and Dry Mixtures: Gradually add the dry ingredient mixture to the wet mixture, alternating with the milk. Mix just until combined.
- Scoop the Batter: Using a spoon or cookie scoop, drop small rounds (about 1 tablespoon each) of batter onto the prepared baking sheet, spacing them a few inches apart.
- Bake: Bake for 10-15 minutes, or until the cookies spring back when pressed gently. Remove from the oven and let cool completely on a wire rack.
- Prepare Filling: While the cookies cool, prepare the filling by mixing powdered sugar with whipped cream until fluffy.
- Assemble Whoopie Pies: Pipe or spread the filling onto the flat side of one cookie, then press another cookie on top to create a sandwich.
- Decorate: Melt the candy melts according to package instructions. Dip the front of each whoopie pie in the melts, allowing any excess to drip off. Use melted chocolate or extra candy melts to add bunny features, such as ears, eyes, and whiskers. Attach a mini marshmallow for the bunny tail if desired.
Variations and Tips:
- Flavor Twist: Experiment with different flavors by adding almond extract instead of vanilla or incorporating orange zest for a citrusy kick.
- Colorful Fillings: Use colored cream cheese frosting or flavored buttercream to vary the filling and enhance the festive appearance.
- Storage: Store whoopie pies in an airtight container at room temperature for up to 3 days or refrigerate to extend freshness.
- Decorating Fun: Let children decorate their own whoopie pies with edible glitter, sprinkles, and different candies for a fun family activity.
These Bunny Whoopie Pies are sure to be a hit, bringing smiles and sweet satisfaction to your Easter gatherings!
- The Original Pro Chopper - Our superstar veggie slicer has been creating waves on TikTok! Simple to use,...
- Easy Meal Prep with Rust-Resistant Blades - Our vegetable chopper is perfect for anyone who wants to eat...
- 5-Star Design - The soft-grip TPU handle ensures controlled chopping, while the non-skid rubber base...
Colorful Easter Egg Whoopie Pies

Delightful and festive, colorful Easter egg whoopie pies are a playful twist on the classic treat, perfect for family gatherings, Easter brunch, or any spring celebration. These soft, cake-like cookies are sandwiched with a vibrant, fluffy filling and embellished to resemble colorful Easter eggs. Ideal for kids and adults who love sweet surprises, you can whip up a batch in about 1 hour, including bake time and assembly.
Ingredients:
- 1 cup unsweetened cocoa powder
- 1 ½ cups all-purpose flour
- 1 teaspoon baking soda
- ½ teaspoon baking powder
- ½ teaspoon salt
- ½ cup unsalted butter, softened
- 1 cup granulated sugar
- 1 large egg
- 1 teaspoon vanilla extract
- ½ cup milk
- Food coloring (various colors)
- 1 cup marshmallow fluff
- ½ cup powdered sugar
- 1 teaspoon vanilla extract (for filling)
- Colored sprinkles or edible glitter (for decoration)
Instructions:
- Preheat Oven: Preheat your oven to 350°F (175°C) and line two baking sheets with parchment paper.
- Mix Dry Ingredients: In a bowl, whisk together cocoa powder, flour, baking soda, baking powder, and salt. Set aside.
- Cream Butter and Sugar: In a large mixing bowl, cream together the softened butter and granulated sugar until light and fluffy.
- Add Egg and Vanilla: Beat in the egg and vanilla extract until well combined.
- Combine Mixtures: Gradually add the dry ingredients to the wet mixture, alternating with milk. Mix until smooth.
- Color the Batter: Divide the batter into separate bowls, adding different food coloring to each bowl to create a range of colors. Mix until the colors are vibrant.
- Scoop Batter: Using a spoon or a cookie scoop, drop spoonfuls of each colored batter onto the prepared baking sheets, leaving space between each for spreading.
- Bake: Bake in the preheated oven for 10-12 minutes, or until the edges are firm. Let cool on the baking sheets for a few minutes before transferring to wire racks to cool completely.
- Prepare Filling: In a mixing bowl, combine marshmallow fluff, powdered sugar, and vanilla extract. Mix until smooth and creamy.
- Assemble Whoopie Pies: Once the cookies are completely cool, match them in pairs. Spread a generous amount of the marshmallow filling on the flat side of one cookie, and sandwich it with the other.
- Decorate: Spread colored sprinkles or edible glitter around the edges of the filling for a festive touch.
Variations and Tips:
- Flavor Variations: Experiment with different cake flavors, such as vanilla or lemon, by substituting the cocoa powder with corresponding flavored extracts or zest.
- Fillings: Try using flavored buttercreams, cream cheese frosting, or even fruit preserves for the filling instead of marshmallow fluff.
- Egg Shapes: Instead of round cookies, you can shape the cookies into oval or egg shapes for a more authentic Easter egg appearance.
- Storage: Keep the assembled whoopie pies in an airtight container in the fridge for up to a week or freeze them for longer storage.
- Color Customization: Tailor the colors to your Easter theme, whether pastel for a classic look or bold for a more vibrant display.
Enjoy your colorful Easter egg whoopie pies, a delightful treat that will bring smiles to all!
- Makes Everything Simple : Just forget your bagged cheese! Only turn the handle for several times and get...
- Premium Material : All parts of the rotary cheese grater are made of food grade ABS material, no BPA. The...
- Three Option Grater : The parmesan cheese grater finishes food preparation with slicing, shredding and...
Spring Flower Whoopie Pies

Spring Flower Whoopie Pies are a delightful and whimsical treat perfect for celebrating Easter or springtime gatherings. These charming dessert sandwiches consist of moist, cake-like cookies that are filled with a rich and creamy frosting, making them an ideal sweet for kids and adults alike. They take about 30 minutes to prepare and an additional 20 minutes to bake, with cooling time included, making them a manageable yet impressive dessert option for parties, picnics, or simply to brighten up your day.
Ingredients:
- 2 cups all-purpose flour
- 1/2 cup unsweetened cocoa powder
- 1 teaspoon baking soda
- 1/2 teaspoon baking powder
- 1/4 teaspoon salt
- 1/2 cup unsalted butter, softened
- 1 cup granulated sugar
- 1 large egg
- 1 teaspoon vanilla extract
- 1 cup milk
- 1/2 cup butter, softened (for filling)
- 2 cups powdered sugar
- 1-2 tablespoons milk (for filling)
- Food coloring (various colors)
- Edible decorations (sprinkles, candy petals, etc.)
Cooking Steps:
- Preheat your oven to 350°F (175°C). Line two baking sheets with parchment paper.
- In a medium bowl, whisk together flour, cocoa powder, baking soda, baking powder, and salt. Set aside.
- In a large bowl, cream together the softened butter and granulated sugar until light and fluffy. This may take about 2-3 minutes.
- Add the egg and vanilla extract to the butter mixture, mixing until well combined.
- Gradually add the dry ingredients to the wet mixture, alternating with the milk, and mix until just combined. Do not overmix.
- Using a tablespoon or cookie scoop, drop mounds of dough onto the prepared baking sheets, spacing them about 2 inches apart.
- Bake for 10-12 minutes, or until the cookies spring back when lightly pressed. Allow them to cool on the baking sheets for 5 minutes before transferring to wire racks to cool completely.
- In a separate mixing bowl, beat the softened butter for the filling until creamy. Gradually add the powdered sugar and 1 tablespoon of milk, mixing until smooth. Adjust consistency with additional milk if necessary.
- Divide the frosting into separate bowls and add food coloring to each as desired. Mix until the colors are vibrant.
- Once the cookies have completely cooled, spread a generous amount of frosting on the flat side of one cookie and top with another cookie to create a sandwich.
- Decorate the edges with edible sprinkles or candy petals to give them a beautiful spring flower look.
Variations and Tips:
- For a twist, you can use flavored extracts like almond or mint instead of vanilla for the frosting to add unique flavors.
- If you prefer a less sweet flavor, you can reduce the amount of powdered sugar in the filling or use cream cheese frosting instead.
- To make the whoopie pies look like flowers, pipe the frosting in petal shapes or use a star tip to create a more decorative edge.
- Feel free to switch up the colors based on your theme—pastel colors are especially popular for spring, but you can go bright and bold too!
- Store any leftover whoopie pies in an airtight container in the refrigerator for up to a week, or freeze them for longer storage.
- 💰 REDUCE WASTE AND SAVE MONEY: Chef Preserve keeps FOOD FRESH 5 TIMES LONGER than non-vacuum storage...
- ✅ POWERFUL, QUICK & EASY TO USE: Simply press the button to start. The device vacuum seals a bag in 5...
- ♻️ REUSABLE & RESEALABLE BAGS: Chef Preserve comes with dishwasher, freezer, refrigerator, and...
Chickadee Whoopie Pies

Chickadee Whoopie Pies are adorable, playful treats perfect for Easter celebrations, springtime gatherings, or simply as a fun baking project with children. With their soft chocolate cookies and creamy marshmallow filling, these whimsical desserts not only taste delightful but also bring a smile to everyone’s face.
This recipe takes about 45 minutes to prepare and can yield approximately 12 sandwich cookies that are sure to be a hit with both kids and adults alike.
Ingredients:
- 1 cup all-purpose flour
- 1/3 cup unsweetened cocoa powder
- 1 teaspoon baking soda
- 1/2 teaspoon salt
- 1/2 cup unsalted butter, softened
- 1 cup sugar
- 1 large egg
- 1 teaspoon vanilla extract
- 1 cup marshmallow fluff
- 1/4 cup powdered sugar
- 2 tablespoons milk
- 1 package candy melts (yellow and black)
- 12 candy eyes
Instructions:
- Preheat the Oven: Preheat your oven to 350°F (175°C) and line a baking sheet with parchment paper.
- Mix Dry Ingredients: In a small bowl, whisk together the flour, cocoa powder, baking soda, and salt.
- Cream Butter and Sugar: In a large mixing bowl, cream the softened butter and sugar together until light and fluffy, about 3-5 minutes.
- Add Egg and Vanilla: Beat in the egg and vanilla extract until fully incorporated.
- Combine Mixtures: Gradually add the dry ingredients to the wet mixture, mixing until just combined.
- Shape Cookies: Using a tablespoon, drop heaping spoonfuls of dough onto the prepared baking sheet, leaving space between each dollop.
- Bake: Bake for 8-10 minutes, or until the cookies spring back when lightly pressed. Let them cool on the baking sheet for a few minutes before transferring them to a wire rack to cool completely.
- Prepare Filling: In a separate bowl, combine marshmallow fluff, powdered sugar, and milk. Mix until smooth and creamy.
- Assemble Whoopie Pies: Once the cookies have cooled, spread a generous amount of the marshmallow filling on the flat side of one cookie, then top with another cookie to create a sandwich.
- Decorate: Melt the yellow and black candy melts according to the package instructions. Dip the tops of the whoopie pies into the melted yellow candy and gently shake off excess.
Use black candy melts to create the beak and feet on the side of each cookie, and place candy eyes on top while the coating is still wet.
Variations & Tips:
- Try using vanilla cookies instead of chocolate for a different flavor combination.
- Add colored sprinkles to the melted candy coating for extra fun and color.
- Replace marshmallow fluff with cream cheese frosting for a richer filling option.
- To make the project easier for kids, prepare the cookie dough ahead of time and let them do the decorating!
- Store whoopie pies in an airtight container at room temperature for up to 3 days.
Enjoy these delightful Chickadee Whoopie Pies at your next gathering, and watch them disappear in no time!
- Generous Capacity: 7-quart slow cooker that comfortably serves 9+ people or fits a 7-pound roast
- Cooking Flexibility: High or low slow cooking settings, with convenient warm function for ideal serving...
- Convenient: Set it and forget it feature enables you to cook while at work or performing daily tasks
Carrot Patch Whoopie Pies

Carrot Patch Whoopie Pies are a delightful twist on the classic American dessert, perfect for celebrating Easter or spring gatherings.
These adorable treats consist of two soft, spiced carrot cake cookies sandwiched together with a rich cream cheese filling, all decorated to resemble a cute little carrot patch. Ideal for both kids and adults, they are not only fun to make but also deliciously satisfying. The preparation time is approximately 30 minutes, with an additional 30 minutes for cooling and assembling.
Ingredients:
- 1 cup all-purpose flour
- 1 teaspoon baking powder
- 1 teaspoon ground cinnamon
- 1/2 teaspoon ground ginger
- 1/4 teaspoon salt
- 1/2 cup granulated sugar
- 1/2 cup packed brown sugar
- 1/2 cup vegetable oil
- 1 large egg
- 1 cup grated carrots
- 1/2 cup finely chopped walnuts or pecans (optional)
- 1 cup cream cheese, softened
- 1/4 cup unsalted butter, softened
- 2 cups powdered sugar
- 1 teaspoon vanilla extract
- Green candy melts or green icing (for decoration)
- Piping bag or plastic bag (for icing)
Cooking Steps:
1. Preheat Oven: Preheat your oven to 350°F (175°C) and line a baking sheet with parchment paper.
2. Dry Ingredients: In a medium bowl, whisk together the flour, baking powder, cinnamon, ginger, and salt. Set aside.
3. Wet Ingredients: In a large bowl, beat together the granulated sugar, brown sugar, and vegetable oil until well combined. Add the egg and mix well. Stir in the grated carrots and nuts (if using).
4. Combine Mixtures: Gradually add the dry ingredients to the wet mixture, mixing until just combined.
5. Bake Cookies: Using a tablespoon or cookie scoop, drop mounds of the batter onto the prepared baking sheet, spacing them about 2 inches apart. Bake for 10-12 minutes or until the edges are set, and a toothpick inserted in the center comes out clean.
Allow the cookies to cool on the baking sheet for 5 minutes before transferring them to a wire rack to cool completely.
6. Make Filling: While the cookies are cooling, beat together the cream cheese and butter in a medium bowl until smooth. Gradually add the powdered sugar and vanilla extract, mixing until creamy.
7. Assemble Whoopie Pies: Once the cookies are completely cooled, spread a generous amount of the cream cheese filling on the flat side of one cookie, then sandwich it with another cookie. Repeat with the remaining cookies.
8. Decorate: Melt the green candy melts according to package directions. Use a piping bag or a plastic bag with the corner snipped off to pipe little “carrots” on the tops of the whoopie pies, or use green icing to create grass-like decorations around the edges.
Variations and Tips:
- For an extra twist, consider adding a pinch of nutmeg or allspice to the dry ingredients for added flavor.
- Feel free to substitute raisins for the nuts if you prefer a sweeter whoopie pie.
- If you want to make them even more festive, add small candy eggs or edible flowers on top.
- Store whoopie pies in an airtight container in the refrigerator for up to a week for the best flavor and freshness.
- 100% Leak-proof: Guaranteed no-spill seal and secure latches
- Crystal-clear Tritan Built: Stain-resistant and odor-resistant material for a clear view of contents
- Lightweight & Sturdy: Easy to carry, yet durable for everyday use
Rainbow Whoopie Pies

Rainbow Whoopie Pies are a vibrant and whimsical twist on the classic whoopie pie, perfect for Easter celebrations, birthday parties, or any occasion that calls for a touch of festivity.
The colorful cookie sandwiches are soft, cake-like, and filled with a creamy frosting that is sure to delight both kids and adults alike. With a preparation time of about 30 minutes, plus an additional 30 minutes for cooling, these treats are a delightful way to bring some joy and brightness to your dessert table.
Ingredients:
- 1 cup unsalted butter, softened
- 1 cup granulated sugar
- 2 large eggs
- 2 teaspoons vanilla extract
- 2 ½ cups all-purpose flour
- 1 teaspoon baking powder
- 1 teaspoon baking soda
- ¼ teaspoon salt
- 1 cup milk
- Food coloring (red, orange, yellow, green, blue, purple)
- 1 batch of buttercream frosting (store-bought or homemade)
Cooking Steps:
1. Preheat your oven to 350°F (175°C) and line a baking sheet with parchment paper.
2. In a large mixing bowl, cream together the softened butter and granulated sugar until light and fluffy.
3. Add the eggs one at a time, mixing well after each addition, then stir in the vanilla extract.
4. In a separate bowl, whisk together the flour, baking powder, baking soda, and salt.
5. Gradually add the dry ingredients to the wet mixture, alternating with the milk, beginning and ending with the dry ingredients.
Mix until just combined.
6. Divide the batter evenly into six small bowls. Add a few drops of each food coloring to each bowl, mixing until the desired colors are achieved.
7. Using a spoon or a piping bag, dollop mounds of each color batter onto the prepared baking sheet, spacing them at least 2 inches apart.
8. Bake the cookie mounds for 10-12 minutes or until a toothpick inserted in the center comes out clean.
Allow them to cool on the sheet for 5 minutes before transferring to a wire rack to finish cooling completely.
9. Once cooled, spread or pipe a generous amount of frosting on the flat side of one cookie and sandwich it with another, flat side down.
Variations & Tips:
- For a lighter option, consider using a whipped cream filling instead of buttercream frosting.
- You can add sprinkles or edible glitter to the frosting for an extra festive touch.
- If desired, experiment with different flavor extracts, such as almond or lemon, to give the cookies a unique taste.
- To maximize flavors, let the whoopie pies sit in the fridge for about 30 minutes after assembling to allow the filling to set.
- Use cookie cutters to create fun shapes for a themed party or event!
- 𝗘𝗳𝗳𝗼𝗿𝘁𝗹𝗲𝘀𝘀 𝗪𝗲𝗶𝗴𝗵𝗶𝗻𝗴: Supports 5 units...
- 𝗣𝗿𝗲𝗰𝗶𝘀𝗲 𝗥𝗲𝘀𝘂𝗹𝘁𝘀: Accurately weighs up to 11 lb/5 kg with 1 g...
- 𝗦𝗶𝗺𝗽𝗹𝗲 & 𝗖𝗼𝗺𝗽𝗮𝗰𝘁: The small and sleek scale is a perfect fit for...
Polka Dot Whoopie Pies

Polka Dot Whoopie Pies are a fun and whimsical dessert that are perfect for Easter celebrations or any festive gathering. These delightful treats consist of soft, cake-like cookies sandwiched together with a creamy filling and decorated with colorful polka dots that capture the spirit of spring. Ideal for kids and adults alike, they make for a deliciously playful addition to your dessert table.
The preparation time for this recipe is approximately 30 minutes, with an additional 20 minutes for baking and cooling.
Ingredients
- 1 cup all-purpose flour
- 1/2 cup unsweetened cocoa powder
- 1 teaspoon baking soda
- 1/2 teaspoon salt
- 1/2 cup unsalted butter, softened
- 1 cup granulated sugar
- 1 large egg
- 1 teaspoon vanilla extract
- 1/2 cup milk
- 1 cup powdered sugar
- 1/4 cup cream cheese, softened
- 2-3 tablespoons milk (for filling)
- Food coloring (various colors for polka dots)
- Nonpareils or sprinkles (optional for decoration)
Instructions
- Preheat Oven: Preheat your oven to 350°F (175°C) and line a baking sheet with parchment paper.
- Dry Ingredients: In a medium bowl, whisk together the flour, cocoa powder, baking soda, and salt until well combined.
- Creaming Butter and Sugar: In a large mixing bowl, cream the softened butter and granulated sugar together until fluffy and light in color.
- Add Egg and Vanilla: Beat in the egg and vanilla extract until fully incorporated.
- Combine Wet and Dry: Gradually add the dry ingredients to the wet mixture alternately with the milk, starting and ending with the flour mixture. Mix until just combined.
- Create Polka Dot Batter: Divide the batter into separate bowls (as many as you have colors of food coloring) and add a few drops of food coloring to each bowl, mixing until the desired colors are reached.
- Pipe Polka Dots: Using a piping bag, pipe small dots of the colored batter onto the prepared baking sheet. Allow space between each dot as they will spread when baking.
- Final Batter Layer: Pipe larger rounds of the chocolate batter over the colored dots, ensuring that they are covered.
- Bake: Bake in the preheated oven for 10-12 minutes or until the edges are set. Remove from oven and let cool on the baking sheet for a few minutes before transferring to a wire rack to cool completely.
- Make the Filling: In a mixing bowl, combine the powdered sugar, cream cheese, and milk; mix until smooth and creamy. Adjust the amount of milk for desired consistency.
- Sandwich the Pies: Once the cookies are completely cool, spread a dollop of the cream filling onto the flat side of one cookie and top it with another cookie, flat side down, creating a sandwich.
- Decorate: If desired, roll the edges of the whoopie pies in nonpareils or sprinkles to add an extra touch of fun.
Variations and Tips
- Flavor Variation: Swap out the cocoa powder for vanilla or lemon extract for a lighter whoopie pie flavor.
- Filling Options: Experiment with different fillings such as marshmallow fluff, peanut butter, or flavored buttercreams to match the season or occasion.
- Storage: Store the whoopie pies in an airtight container at room temperature for up to 3 days or in the refrigerator for a longer shelf life.
- Presentation: For an Easter-themed presentation, use pastel colors for the polka dots and arrange the finished pies in a decorative basket with grass and eggs.
- Kids’ Activity: Get children involved in decorating their own polka dot whoopie pies with different colors and toppings!
- Instant Read Food Thermometer | Our instant read thermometer features a temperature probe and advanced,...
- Multi-Use | From bbq thermometer to baking thermometer, our digital food thermometer for cooking is...
- Easy-Read Digital Thermometer For Cooking | Large instant thermometer dial with bright blue backlight...
Chocolate Bunny Whoopie Pies

Chocolate Bunny Whoopie Pies are a delightful treat that combines soft, chocolate cake-like cookies with a creamy filling, perfect for celebrating Easter with family and friends.
These adorable whoopie pies not only taste divine but also add a festive touch to any dessert table. Ideal for bakers of all skill levels and anyone looking to impress guests or delight children, this recipe takes approximately 45 minutes to prepare and assemble.
Ingredients:
- 1 cup all-purpose flour
- 1/2 cup unsweetened cocoa powder
- 1 teaspoon baking soda
- 1/2 teaspoon salt
- 1/2 cup unsalted butter, softened
- 1 cup granulated sugar
- 1 large egg
- 1 teaspoon vanilla extract
- 1/2 cup buttermilk
- 1 cup marshmallow fluff
- 1/4 cup confectioners’ sugar
- 1 teaspoon vanilla extract (for filling)
- Chocolate or vanilla melting wafers (for decoration)
- Candy eyeballs (optional)
- Sprinkles (optional)
- Chocolate bunny molds (optional, for shapes)
Instructions:
- Preheat your oven to 350°F (175°C) and line a baking sheet with parchment paper.
- In a medium bowl, whisk together the flour, cocoa powder, baking soda, and salt. Set aside.
- In a large bowl, beat the softened butter and granulated sugar together until light and fluffy, about 2-3 minutes.
- Add the egg and vanilla extract to the butter mixture, beating until fully incorporated.
- Gradually add the dry ingredients to the wet mixture, alternating with the buttermilk, starting and ending with the dry ingredients. Mix until just combined.
- Using a spoon or cookie scoop, drop tablespoon-sized mounds of the batter onto the prepared baking sheet, spacing them about 2 inches apart.
- Bake for 10-12 minutes or until the tops spring back when lightly touched. Allow to cool on the baking sheet for 5 minutes before transferring to a wire rack to cool completely.
- In a medium bowl, mix the marshmallow fluff, confectioners’ sugar, and vanilla extract until smooth and well combined to create the filling.
- Once the cookies are completely cooled, spread a generous amount of the filling on the flat side of one cookie and top with another cookie, flat-side down, to create a whoopie pie.
- For decoration, melt the chocolate or vanilla melting wafers according to package directions. Dip the edges of your whoopie pies into the melted chocolate, and add candy eyeballs or sprinkles for a cute bunny touch. Allow the chocolate to set before serving.
Variations & Tips:
- For a fruity twist, substitute marshmallow fluff with strawberry or raspberry jam for the filling.
- You can use a piping bag to fill the whoopie pies for a neater presentation.
- Use chocolate bunny molds to shape some of the batter, creating fun chocolate bunny whoopie pie shapes.
- To enhance the chocolate flavor, consider adding a tablespoon of espresso powder to the batter.
- Make sure the cookies cool completely before filling to prevent the filling from melting.
Enjoy these festive Chocolate Bunny Whoopie Pies as a sweet addition to your Easter celebration!
- Versatile 54-Piece Collection: Elevate your kitchen with the Home Hero 54-Piece Kitchen Utensil Set, a...
- Durable and Long-Lasting: Crafted from premium stainless steel, these kitchen utensils are designed to...
- Perfect Holiday Gift: Delight your loved ones with this kitchen utensils gift set this festive season....
Mini Egg Whoopie Pies

Mini Egg Whoopie Pies are delightful, cream-filled cookies that make the perfect Easter treat!
These bite-sized desserts are not only visually appealing but also a delightful combination of soft chocolate cookies with a sweet, fluffy filling, perfectly complemented by the crunch of mini chocolate eggs.
They are ideal for springtime gatherings, kids’ parties, or as a festive gift for loved ones.
With a preparation time of about 30 minutes and an additional 15 minutes for baking, you can whip up a batch in no time!
Ingredients:
- 1 cup all-purpose flour
- 1/3 cup unsweetened cocoa powder
- 1 tsp baking soda
- 1/4 tsp salt
- 1/2 cup unsalted butter, softened
- 1 cup granulated sugar
- 1 large egg
- 1 tsp vanilla extract
- 1/2 cup milk
- 1 cup powdered sugar
- 1/4 cup unsalted butter, softened (for filling)
- 1 tsp vanilla extract (for filling)
- 1-2 tbsp milk (for filling)
- Mini chocolate eggs (for decoration)
Cooking Steps:
- Preheat the Oven: Preheat your oven to 350°F (175°C) and line a baking sheet with parchment paper.
- Mix Dry Ingredients: In a medium bowl, whisk together the flour, cocoa powder, baking soda, and salt. Set aside.
- Cream Butter and Sugar: In a large mixing bowl, beat the softened butter and granulated sugar together until light and fluffy.
- Add Egg and Vanilla: Add the egg and 1 tsp vanilla extract to the butter-sugar mixture and mix until well combined.
- Combine Mixtures: Gradually add the dry ingredients to the wet mixture while alternating with the milk. Mix until just combined; do not overmix.
- Spoon Batter: Drop tablespoon-sized amounts of batter onto the prepared baking sheet, spacing them about 2 inches apart.
- Bake: Bake in the preheated oven for 10-12 minutes, or until a toothpick inserted into the center comes out clean. Allow them to cool on the baking sheet for 5 minutes, then transfer to a wire rack to cool completely.
- Make Filling: In a medium bowl, beat together the softened butter, powdered sugar, 1 tsp vanilla extract, and enough milk to achieve a smooth, fluffy consistency. Adjust milk as necessary.
- Assemble Whoopie Pies: Once the cookies are completely cool, spread or pipe a generous amount of filling onto the flat side of one cookie and top it with another cookie, pressing down gently.
- Decorate: Press a few mini chocolate eggs into the filling on the assembled whoopie pies for that festive touch.
Variations & Tips:
- Flavors: Try using different flavored cookies, such as vanilla or even peppermint, to switch things up!
- Filling Options: Add food coloring to the filling to match Easter themes or mix in sprinkles for added fun.
- Make Ahead: The cookies can be made days in advance and assembled closer to your event to keep them fresh.
- Storing: Keep the whoopie pies in an airtight container in the fridge for up to a week or at room temperature for about 3 days.
With these Mini Egg Whoopie Pies, you’ll have a delightful dessert that captures the spirit of Easter!
Enjoy your festive baking!
- 24-ounce insulated stainless-steel water bottle with a FreeSip spout and push-button lid with lock
- Patented FreeSip spout designed for either sipping upright through the built-in straw or tilting back to...
- Protective push-to-open lid keeps spout clean; convenient carry loop doubles as a lock
Pastel Swirl Whoopie Pies

Pastel Swirl Whoopie Pies are a delightful twist on the classic treat, making them a perfect dessert for spring gatherings, Easter celebrations, or any festive occasion. With their soft, cake-like cookies swirled in cheerful pastel shades and filled with a luscious buttercream frosting, they appeal to both kids and adults alike.
With a preparation time of approximately 1 hour, these whoopie pies are not only fun to make but also a joy to serve, adding a pop of color to any dessert table.
Ingredients:
- 2 cups all-purpose flour
- 1/2 cup unsweetened cocoa powder
- 1 teaspoon baking soda
- 1/2 teaspoon salt
- 1/2 cup unsalted butter, room temperature
- 1 cup granulated sugar
- 1/2 cup brown sugar, packed
- 2 large eggs
- 1 teaspoon vanilla extract
- 1 cup buttermilk
- Food coloring (pastel shades: pink, blue, yellow, green)
- 1 cup unsalted butter, room temperature (for frosting)
- 4 cups powdered sugar
- 2 tablespoons milk
- 1 teaspoon vanilla extract (for frosting)
Cooking Steps:
- Preheat the oven to 350°F (175°C) and line baking sheets with parchment paper.
- In a medium bowl, whisk together the flour, cocoa powder, baking soda, and salt. Set aside.
- In a large mixing bowl, cream the butter, granulated sugar, and brown sugar together until light and fluffy.
- Add the eggs one at a time, mixing well after each addition, followed by the vanilla extract.
- Alternate adding the dry ingredients and buttermilk to the butter mixture, starting and ending with the dry ingredients. Mix until just combined.
- Divide the batter into four bowls. Add a few drops of different food coloring to each bowl to create pastel colors and gently swirl each bowl to combine colors, but don’t over-mix – you want a nice marbled effect.
- Using a spoon or piping bag, drop tablespoonfuls of the different colored batters onto the prepared baking sheets, spacing them about 2 inches apart.
- Bake in the preheated oven for 10-12 minutes or until the cookies spring back when lightly touched.
- Remove from the oven and let cool on the baking sheets for 5 minutes before transferring to a wire rack to cool completely.
- For the frosting, beat the butter in a mixing bowl until creamy. Gradually add in the powdered sugar, then the milk and vanilla extract. Beat until smooth and fluffy.
- Once cookies are cool, pair them up by size, pipe or spread frosting on the flat side of one cookie, and top with another cookie to form a sandwich.
Variations:
- Use different flavor extracts in the frosting, like almond or lemon, for a unique twist.
- Instead of buttercream, try cream cheese frosting for a tangy variation.
- Decorate the whoopie pies with sprinkles or edible glitter for added sparkle!
Tips:
- Verify your butter is at room temperature for easier creaming with the sugars.
- Don’t skip the parchment paper; it helps avoid sticking and makes cleanup easier.
- Store the whoopie pies in an airtight container to keep them fresh for up to a week.
- For a fun presentation, serve with colorful plates and napkins that match the pastel colors of the pies.
Crafty Decorated Whoopie Pies

Whoopie pies are delightful sandwich cookies that consist of two soft and cake-like cookies filled with a creamy filling.
These Easter-themed whoopie pies can be decorated to resemble festive shapes and colors, making them a fun treat for kids and adults alike. Perfect for Easter gatherings, festive parties, or simply as a creative baking project, this recipe takes about 45 minutes to prepare and decorate, resulting in about 12-16 whoopie pies depending on size.
Ingredients:
- 1 cup all-purpose flour
- 1 cup cocoa powder
- 1 teaspoon baking soda
- ½ teaspoon baking powder
- ½ teaspoon salt
- ½ cup unsalted butter, softened
- 1 cup granulated sugar
- 1 large egg
- 1 teaspoon vanilla extract
- ½ cup buttermilk
- 1 cup powdered sugar
- ½ cup marshmallow fluff
- ½ teaspoon vanilla extract (for filling)
- Colored frosting or edible decorations for Easter themes (e.g. sprinkles, candy eyes, mini chocolate eggs)
Cooking Steps:
- Preheat your oven to 350°F (175°C) and line a baking sheet with parchment paper.
- In a medium bowl, whisk together the flour, cocoa powder, baking soda, baking powder, and salt until well combined.
- In a large mixing bowl, beat the softened butter and granulated sugar together until light and fluffy.
- Add the egg and vanilla extract to the butter mixture and mix until smooth.
- Gradually add the dry ingredients to the wet ingredients, alternating with the buttermilk. Start and end with the dry ingredients, mixing just until combined.
- Use a cookie scoop to drop dollops of batter onto the prepared baking sheet, leaving space between each one.
- Bake in the preheated oven for 10-12 minutes, until the tops are set and a toothpick comes out clean.
- Allow the cookies to cool completely on the baking sheet before transferring them to a wire rack.
- In another bowl, combine the powdered sugar, marshmallow fluff, and vanilla extract to make the filling. Mix until smooth.
- Once the cookies are cool, spread a generous amount of filling on the flat side of one cookie and top it with another, flat side down, to create a sandwich.
- Decorate the whoopie pies with colored frosting and festive Easter decorations.
Variations and Tips:
- For a twist, consider flavoring the filling with different extracts like almond or mint.
- Use pastel food coloring to tint the frosting for a delightful, colorful presentation.
- Instead of frosting, you can roll the edges in mini chocolate chips or shredded coconut for added texture.
- You can create festive shapes using cookie cutters with the cooled cookies or add edible markers to draw faces or patterns on decorated frosting.
- For a healthier version, consider substituting some all-purpose flour with whole wheat flour or incorporating pureed fruits into the filling.
Enjoy your crafty Easter whoopie pies, perfect for sharing or delightful personal treats!
Sprinkle-topped Whoopie Pies
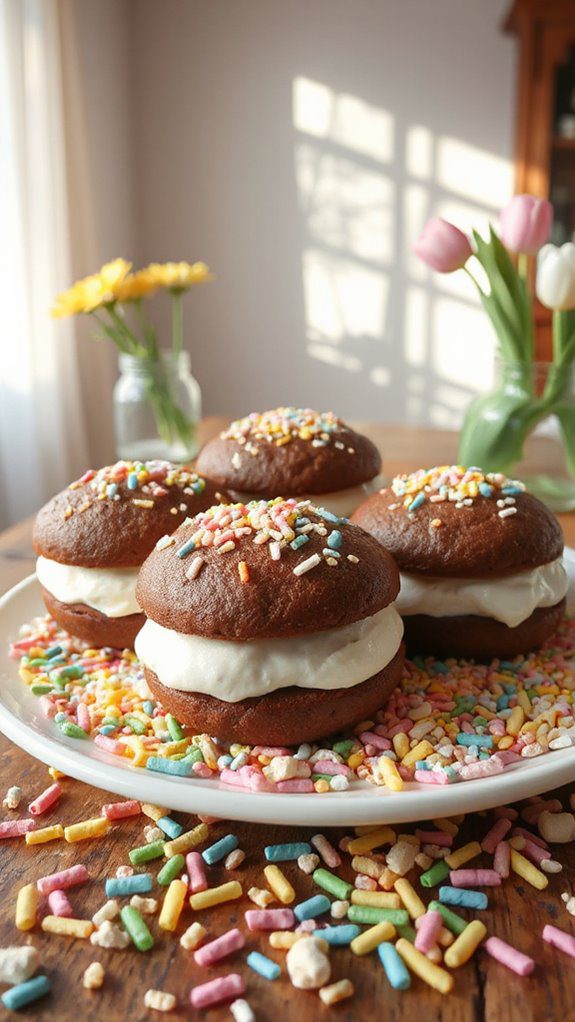
Sprinkle-topped whoopie pies are delightful, creamy indulgences that are perfect for Easter celebrations and springtime gatherings. These sweet treats consist of two soft, cake-like chocolate or vanilla cookies sandwiched around a fluffy filling, often cream or frosting, and adorned with colorful sprinkles for a festive touch.
Ideal for kids and adults alike, these whoopie pies can be prepared in about 30 minutes, making them an easy yet impressive addition to your dessert table.
Ingredients
- 1 cup all-purpose flour
- 1/2 cup unsweetened cocoa powder (or use vanilla cake mix for vanilla whoopie pies)
- 1 tsp baking soda
- 1/2 tsp salt
- 1/2 cup unsalted butter, softened
- 1 cup granulated sugar
- 1 large egg
- 1 tsp vanilla extract
- 1/2 cup milk
- 1 cup marshmallow fluff
- 1/2 cup powdered sugar
- 1/4 cup sprinkles (assorted colors for decoration)
Cooking Steps
- Preheat the Oven: Preheat your oven to 350°F (175°C) and line a baking sheet with parchment paper.
- Mix Dry Ingredients: In a medium bowl, whisk together the flour, cocoa powder, baking soda, and salt. Set aside.
- Cream Butter and Sugar: In a large mixing bowl, using an electric mixer, cream together the softened butter and granulated sugar until light and fluffy, about 3-4 minutes.
- Add Egg and Vanilla: Beat in the egg and vanilla extract until fully combined.
- Combine Ingredients: Gradually add the dry ingredient mixture to the wet ingredients alternately with the milk, starting and ending with the flour mixture. Mix until just combined.
- Scoop the Batter: Using a cookie scoop or tablespoon, drop rounded balls of batter onto the prepared baking sheet, spacing them about 2 inches apart.
- Bake: Bake in the preheated oven for 10-12 minutes or until the edges are set and the tops are slightly cracked. Remove from the oven and let them cool on the baking sheet for 5 minutes before transferring to a wire rack to cool completely.
- Prepare the Filling: In a bowl, mix together the marshmallow fluff and powdered sugar until smooth and fluffy.
- Assemble the Whoopie Pies: Once the cookies are completely cooled, spread the filling on the flat side of one cookie and top it with another cookie, flat side down, to create a sandwich.
- Add Sprinkles: If desired, roll the edges of the filling in sprinkles for an extra festive touch.
Variations and Tips
- Flavor Options: For a different spin, try using different cake mixes, such as red velvet or lemon, which also pair well with cream cheese filling or lemon frosting.
- Filling Choices: Substitute marshmallow fluff with buttercream, cream cheese frosting, or whipped cream for varied flavor profiles.
- Storage: These whoopie pies can be stored in an airtight container at room temperature for up to 3 days or in the refrigerator for about a week.
- Decorative Ideas: Experiment with themed sprinkles, such as pastel colors for Easter, or use edible glitter for a touch of sparkle.
Perfect for any festive occasion, these sprinkle-topped whoopie pies are sure to delight friends and family alike!
Glittery Easter Basket Whoopie Pies

Glittery Easter Basket Whoopie Pies are delightful and festive treats that capture the essence of Easter celebrations. Perfect for kids and adults alike, these whoopie pies feature a soft, cake-like exterior filled with a luscious buttercream frosting, all adorned with colorful edible glitter to resemble an Easter basket.
With a preparation time of about 30 minutes and an additional 2 hours for chilling, these pies are great for holiday gatherings, spring parties, or as a sweet surprise in an Easter basket.
Ingredients:
- 1 cup all-purpose flour
- 1/2 cup unsweetened cocoa powder
- 1 teaspoon baking soda
- 1/2 teaspoon salt
- 1/2 cup unsalted butter, softened
- 1 cup granulated sugar
- 1 large egg
- 1 teaspoon vanilla extract
- 1/2 cup whole milk
- 1 cup powdered sugar
- 1/2 cup unsweetened cocoa powder (for filling)
- 1/4 cup unsalted butter, softened (for filling)
- 2-3 tablespoons milk (for filling)
- Edible glitter
- Colored sprinkles (optional)
- Mini candy eggs or jelly beans (for garnish)
Cooking Steps:
- Preheat the Oven: Preheat your oven to 350°F (175°C) and line two baking sheets with parchment paper.
- Mix Dry Ingredients: In a bowl, whisk together flour, cocoa powder, baking soda, and salt until well combined. Set aside.
- Cream Butter and Sugar: In a large bowl, using an electric mixer, cream together the softened butter and granulated sugar until light and fluffy.
- Add Egg and Vanilla: Beat in the egg and vanilla extract until fully incorporated.
- Combine Mixtures: Gradually add the dry ingredients to the wet mixture, alternating with the milk, mixing until just combined.
- Form the Cookies: Using a cookie scoop or spoon, drop rounded tablespoons of dough onto the prepared baking sheets, spacing them about 2 inches apart.
- Bake: Bake for 10-12 minutes or until the cookies are set. Allow them to cool on the baking sheets for 5 minutes before transferring to a wire rack to cool completely.
- Prepare Filling: In a separate bowl, beat together the softened butter and powdered sugar until combined. Add cocoa powder and milk, mixing until you reach a smooth and spreadable consistency.
- Assemble Whoopie Pies: Once the cookies are completely cool, spread a generous amount of the filling on the bottom of one cookie and top it with another, pressing gently to combine.
- Decorate: Lightly dust the filled whoopie pies with edible glitter and sprinkle colored sprinkles around the edges. Top with mini candy eggs or jelly beans for a basket-like effect.
- Chill: For best results, refrigerate the whoopie pies for about 1 hour to allow the filling to set before serving.
Variations and Tips:
- Flavored Fillings: Experiment with different flavored frostings, such as cream cheese or lemon buttercream, for a fresh twist.
- Colorful Dough: Add a few drops of food coloring to the cookie dough to create pastel shades that evoke the spirit of spring.
- Serving Suggestion: Serve these whoopie pies with a side of fresh fruit for a balanced spring dessert table.
- Storage: Keep leftover whoopie pies in an airtight container in the fridge for up to 3 days or freeze for longer storage.
Get ready to impress your family and friends with these stunning and delicious Glittery Easter Basket Whoopie Pies!
S’mores Inspired Whoopie Pies

S’mores Inspired Whoopie Pies combine the delightful elements of the traditional campfire treat with the whimsical charm of whoopie pies, making them perfect for any fun gathering or festive celebration, especially around Easter!
These sweet, soft cookies filled with a creamy marshmallow and chocolate ganache filling are a crowd-pleaser for both kids and adults alike. The preparation time for this delicious dessert is approximately 45 minutes, followed by some cooling time before assembling.
Ingredients:
- 1 cup all-purpose flour
- 1/4 cup unsweetened cocoa powder
- 1/2 teaspoon baking powder
- 1/4 teaspoon baking soda
- 1/4 teaspoon salt
- 1/2 cup unsalted butter, softened
- 1 cup granulated sugar
- 1 large egg
- 1 teaspoon vanilla extract
- 1/2 cup graham cracker crumbs
- 1 cup mini marshmallows
- 1/2 cup chocolate chips
- 1/2 cup heavy cream
Cooking Steps:
- Preheat your oven to 350°F (175°C) and line a baking sheet with parchment paper.
- In a medium bowl, sift together the flour, cocoa powder, baking powder, baking soda, and salt. Set aside.
- In a large mixing bowl, cream together the softened butter and granulated sugar until light and fluffy.
- Add in the egg and vanilla extract, mixing until well incorporated.
- Gradually add the dry ingredients to the wet ingredients, mixing just until combined. Avoid overmixing.
- Fold in the graham cracker crumbs until evenly distributed throughout the batter.
- Using a tablespoon or cookie scoop, drop rounded tablespoons of dough onto the prepared baking sheet, leaving enough space between each for spreading.
- Bake for 10-12 minutes or until the edges are set. Allow cookies to cool on the baking sheet for 5 minutes, then transfer them to a wire rack to cool completely.
- While the cookies cool, make the filling. In a small saucepan, heat the heavy cream over medium heat until it simmers. Remove from heat and add the chocolate chips, stirring until smooth and glossy.
- Fold in the mini marshmallows into the chocolate ganache after it has cooled slightly.
- Once the cookies are completely cooled, pair them up by size and spread a generous dollop of the filling onto the flat side of one cookie, then top it with its pair.
- For added flair, sprinkle extra graham cracker crumbs on the edges of the filling before serving.
Variations & Tips:
- For an extra indulgent treat, you can roast the mini marshmallows with a kitchen torch before adding them to the filling for a toasted flavor.
- Try adding a hint of peppermint extract to the filling for a festive twist.
- Feel free to substitute the chocolate chips with peanut butter chips or white chocolate for a different flavor profile.
- If you’re short on time, pre-made chocolate ganache can also substitute for homemade.
- To store, keep the whoopie pies in an airtight container in the refrigerator for up to one week.
Enjoy these delicious treats as a fun twist on a classic favorite!
Jelly Bean Whoopie Pies

Jelly Bean Whoopie Pies are a delightful and festive treat perfect for Easter celebrations or spring gatherings. These sweet sandwich cookies feature a soft, cake-like exterior filled with a creamy frosting that boasts a pop of color and flavor from jelly beans.
Ideal for families, kids, and sweet tooth enthusiasts, this dessert is both fun to make and eat. The preparation time is about 30 minutes, with an additional 15 minutes for baking, making it a quick and enjoyable project for both novice and experienced bakers alike.
Ingredients:
- 1 cup all-purpose flour
- 1/2 cup unsweetened cocoa powder
- 1 teaspoon baking soda
- 1/2 teaspoon baking powder
- 1/4 teaspoon salt
- 1/2 cup unsalted butter, softened
- 1 cup granulated sugar
- 1 large egg
- 1 teaspoon vanilla extract
- 1/2 cup buttermilk
- 1 cup assorted jelly beans
- 1/2 cup powdered sugar
- 1/4 cup cream cheese, softened
- 1/4 cup unsalted butter, softened (for filling)
- 1/2 teaspoon vanilla extract (for filling)
Cooking Steps:
- Preheat your oven to 350°F (175°C) and line a baking sheet with parchment paper.
- In a bowl, whisk together the flour, cocoa powder, baking soda, baking powder, and salt.
- In a separate large mixing bowl, cream together the softened butter and granulated sugar until light and fluffy.
- Beat in the egg and vanilla extract, mixing until well combined.
- Gradually add the dry ingredients to the wet mixture, alternating with the buttermilk. Begin and end with the dry ingredients, mixing until just combined.
- Fold in the jelly beans, ensuring they are evenly distributed throughout the batter.
- Drop spoonfuls of batter onto the prepared baking sheet, keeping them about 2 inches apart.
- Bake for 10-12 minutes or until the tops spring back when lightly pressed.
- Allow the cookies to cool on the baking sheet for 5 minutes before transferring them to a wire rack to cool completely.
- In the meantime, prepare the filling by beating together the cream cheese, softened butter, powdered sugar, and vanilla extract until smooth and fluffy.
- Once the cookies are cool, spread a generous amount of the cream cheese filling on the flat side of one cookie and sandwich it with another cookie.
- Repeat until all the cookies are filled.
Variations and Tips:
- For a fun twist, substitute different flavored jelly beans to create various combinations.
- If you prefer a lighter filling, consider using whipped cream or marshmallow fluff instead of cream cheese frosting.
- You can enhance the decoration by drizzling melted chocolate over the assembled whoopie pies, or adding sprinkles in pastel colors for a more festive look.
- Store any leftover whoopie pies in an airtight container in the refrigerator for up to a week.
Enjoy your colorful and delicious jelly bean whoopie pies!


