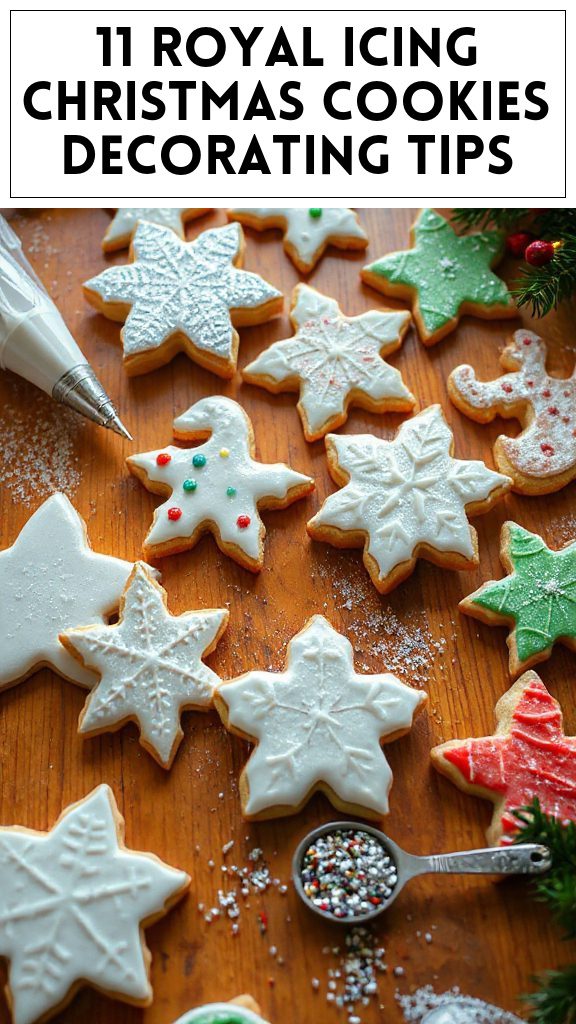
Use the Right Consistency for Royal Icing

Royal icing is a versatile frosting primarily used for decorating cookies, especially during the holiday season. Its smooth finish and ability to hold intricate designs make it ideal for crafting elaborate patterns on Christmas cookies. The key to perfect royal icing lies in achieving the right consistency, which can vary depending on whether you want to outline or flood your cookies. Below is a simple recipe to create royal icing that will help you achieve the desired consistency for your festive cookie decorations.
| Ingredients | Quantity |
|---|---|
| Powdered sugar | 4 cups |
| Egg whites or meringue powder | 3 large egg whites or 4 tablespoons |
| Water | 1-2 teaspoons as needed |
| Vanilla extract | 1 teaspoon |
| Lemon juice (optional) | 1 teaspoon |
Instructions:
- Prepare Your Workspace: Before you begin mixing your royal icing, make sure your workspace is clean and all your tools, including mixing bowl and whisk, are free of grease. This will help the icing whip up properly.
- Combine Egg Whites and Sugar: In a large mixing bowl, combine the powdered sugar and egg whites (or meringue powder). If using meringue powder, add an equal amount of water (4 tablespoons) to activate it.
- Mix to Form Icing: Using a handheld mixer or a stand mixer fitted with a whisk attachment, beat the mixture on low speed until it is well combined. Once combined, increase the speed to medium-high and mix for about 5 to 7 minutes, or until the icing is glossy and forms stiff peaks.
- Add Flavoring: Gently stir in the vanilla extract and lemon juice, if using, to add flavor to your icing. Mixing should be done carefully to avoid deflating the icing.
- Check Consistency: For outlining your cookies, the icing should be thick and hold its shape when piped. For flooding (filling in the designs), add 1-2 teaspoons of water to thin the icing until it reaches a pourable but still thick consistency, resembling that of honey. Mix well, checking the consistency as you adjust.
- Divide and Color Your Icing (if desired): If you want to use different colors for different decorations, divide the icing into separate bowls and add gel food coloring as desired. Mix thoroughly until the color is evenly distributed.
- Transfer Icing to Piping Bags: Use a spatula to transfer the icing into piping bags fitted with a small round tip for outlining and a larger tip for flooding. Twist the end of the piping bag to prevent the icing from drooping out.
- Decorate Your Cookies: Once your royal icing is ready and in piping bags, you can start decorating your cookies. Outline first, let the outline dry briefly, and then flood the centers for a smooth finish. Allow the cookies to dry completely before stacking or packaging.
- Storing Royal Icing: Any leftover icing can be stored in an airtight container at room temperature for a few days or in the refrigerator for longer. Make sure to cover the surface of the icing with plastic wrap to prevent it from drying out.

- The Original Pro Chopper - Our superstar veggie slicer has been creating waves on TikTok! Simple to use,...
- Easy Meal Prep with Rust-Resistant Blades - Our vegetable chopper is perfect for anyone who wants to eat...
- 5-Star Design - The soft-grip TPU handle ensures controlled chopping, while the non-skid rubber base...
Color Your Icing With Care

Coloring your royal icing is an essential step in creating beautiful and festive Christmas cookies. Using gel food coloring allows for vibrant hues without altering the consistency of the icing too much. This guide will help you expertly color your icing to elevate your holiday baking.
| Ingredients | Quantity |
|---|---|
| Royal icing | Prepared batch (as needed) |
| Gel food coloring | Various colors (as desired) |
Instructions:
- Prepare Your Royal Icing: Verify you have a batch of prepared royal icing. Divide it among small bowls based on the number of colors you want to create.
- Add Gel Food Coloring: Using a toothpick or a clean utensil, dip it into the gel food coloring and add it to one bowl of royal icing. Start with a small amount, as gel coloring is very concentrated.
- Mix Completely: Use a small spatula or a teaspoon to mix the gel food coloring into the icing thoroughly. Stir until the color is uniform and no streaks remain. If you desire a deeper color, add more gel coloring a tiny bit at a time, mixing well after each addition.
- Check Consistency: After coloring, check the consistency of the icing. If necessary, you can adjust it by adding a few drops of water to achieve your desired piping or flooding consistency. Mixing gently is key to maintaining the airiness of the icing.
- Transfer to Piping Bags: Once you are happy with the color and consistency, use a spatula to carefully transfer the colored icing into piping bags. This makes it easy to decorate your cookies with precision.
- Label Your Piping Bags: If you have multiple colors, consider labeling the bags or using clips to differentiate them. This will help you keep track of your icing colors as you decorate.
- Start Decorating: Now that your icing is colored and ready, you can begin decorating your Christmas cookies! Use the various colors to create festive designs and patterns as desired.
Remember that a little food coloring goes a long way, so start small and adjust according to the shade you want. Enjoy the creative process of decorating your cookies!

- Makes Everything Simple : Just forget your bagged cheese! Only turn the handle for several times and get...
- Premium Material : All parts of the rotary cheese grater are made of food grade ABS material, no BPA. The...
- Three Option Grater : The parmesan cheese grater finishes food preparation with slicing, shredding and...
Invest in Quality Tools

Investing in quality tools for decorating royal icing Christmas cookies can make a significant difference in the ease and precision of your decorating process. High-quality piping bags, tips, and other tools not only enhance your technique but also result in beautifully finished cookies that will impress family and friends. Let’s explore the essential tools you’ll need for perfecting your holiday cookie decorating.
| Ingredients/Tools | Quantity |
|---|---|
| Piping bags | 5-10 (disposable or reusable) |
| Piping tips (such as round and star tips) | 5-10 (various sizes) |
| Couplers | 2-3 |
| Food-safe scissors | 1 |
| Toothpicks or scribe tool | 1 |
| Palette knife or spatula | 1 |
| Decorating turntable | 1 (optional but helpful) |
| Clean, dry workspace | N/A |
Instructions:
- Choose Your Piping Bags: Start by selecting high-quality piping bags to hold your royal icing. You can choose disposable bags for convenience or reusable silicone bags for sustainability.
- Attach Piping Tips: Depending on the design you have in mind, select the appropriate piping tips. Round tips are great for fine lines and details, while star tips are perfect for creating textured designs. If necessary, use couplers to easily switch between tips without changing the bag.
- Fill Piping Bags: Using your spatula, carefully fill each piping bag with the colored royal icing. Do not overfill; about two-thirds full is typically best to allow for easy handling.
- Seal the Piping Bags: If using disposable bags, twist the bag to prevent the icing from spilling out and secure it with a rubber band or clip. If using reusable bags, simply fold over the top to keep the icing in place.
- Prepare Your Workspace: Clear and clean your decorating area to guarantee your tools are easy to access. Lay down parchment paper or a silicone mat to catch any mess while you work.
- Practice Control: Before you start decorating your cookies, take a moment to practice piping on parchment paper. This will help you get a feel for the pressure required to create different designs without affecting your cookies.
- Utilize a Decorating Turntable (If Available): If you have a decorating turntable, place your cookie on it. This allows you to easily rotate the cookie while decorating, guaranteeing even coverage and precision in your design.
- Create Your Designs: Start decorating your cookies! Use various techniques such as outlining, flooding, and detailing to create your festive design. Don’t forget to use toothpicks or a scribe tool to manipulate and smooth the icing as needed.
- Clean Your Tools: After decorating, clean your tools promptly to prevent any residual icing from hardening on them. Simply rinse with warm water and dry thoroughly before storing.

- 💰 REDUCE WASTE AND SAVE MONEY: Chef Preserve keeps FOOD FRESH 5 TIMES LONGER than non-vacuum storage...
- ✅ POWERFUL, QUICK & EASY TO USE: Simply press the button to start. The device vacuum seals a bag in 5...
- ♻️ REUSABLE & RESEALABLE BAGS: Chef Preserve comes with dishwasher, freezer, refrigerator, and...
Master the Piping Techniques

Mastering piping techniques is essential for decorating royal icing Christmas cookies that are both stunning and delicious. These techniques allow you to create different designs from intricate details to bold borders, helping bring your festive cookie vision to life. Whether you’re a beginner or looking to refine your skills, the following piping techniques will enhance your cookie decorating game.
| Ingredients/Tools | Quantity |
|---|---|
| Royal icing (prepared) | As needed (various colors) |
| Piping bags | 5-10 (disposable or reusable) |
| Piping tips (various sizes) | 5-10 (round and star tips) |
| Couplers | 2-3 |
| Food-safe scissors | 1 |
| Toothpicks or scribe tool | 1 |
| Palette knife or spatula | 1 |
| Clean, dry workspace | N/A |
Instructions:
- Prepare Royal Icing: Confirm your royal icing is properly prepared and has the right consistency for piping. It should hold its shape but be fluid enough to flow through your piping tip.
- Choose Your Piping Tip: Select a piping tip based on the design you want to create. Use a round tip for detailed lines and dots, and a star tip for decorative borders or flowers.
- Fill the Piping Bag: Using your spatula, carefully fill the piping bag with royal icing about two-thirds full. This allows for adequate control when piping. If using a coupler, attach it to the piping bag first, then fit the chosen piping tip securely.
- Seal the Piping Bag: Twist the top of the piping bag to secure the icing inside. Pinch the bag just above the tip to control the flow while you’re piping.
- Practice Your Grip: Hold the piping bag with a firm but gentle grip, using the thumb and forefinger to control the direction and pressure.
- Start With Outlines: For shapes and intricate designs, begin by piping an outline using your round tip. Move the bag steadily to create smooth lines. If the icing breaks or the line is uneven, practice on parchment paper until you gain confidence.
- Fill In the Designs: After outlining, fill in your design by applying consistent pressure to the piping bag. Use a toothpick or scribe tool to spread the icing evenly and remove bubbles.
- Create Textures: For added dimension, switch to a star tip and pipe stars or rosettes. Vary the pressure to create different-sized decorations, experimenting with swirl patterns for a unique effect.
- Layer Designs: If your design requires multiple layers or colors, allow the first layer to dry before applying the next. This will help maintain the integrity of your design and avoid mixing colors.
- Final Touches: After you finish decorating, take a moment to look over your cookies. Use a toothpick or scribe tool to gently correct any imperfections. Allow the cookies to sit undisturbed to dry completely, which may take several hours or overnight.
With practice and patience, these piping techniques will guarantee your royal icing Christmas cookies are not only festive but are true works of art! Enjoy the process and have fun sprinkling holiday cheer with your creations!

- Generous Capacity: 7-quart slow cooker that comfortably serves 9+ people or fits a 7-pound roast
- Cooking Flexibility: High or low slow cooking settings, with convenient warm function for ideal serving...
- Convenient: Set it and forget it feature enables you to cook while at work or performing daily tasks
Create a Solid Outline First

Creating a solid outline is an essential step in decorating royal icing Christmas cookies. This method provides a clear boundary for your designs and guarantees that the flooding process later will be clean and precise. By establishing a strong outline, you can enhance the intricacy of your decorations while preventing colors from bleeding into each other, resulting in a more polished final product.
| Ingredients/Tools | Quantity |
|---|---|
| Royal icing (prepared) | As needed (white for outlines) |
| Piping bag with round tip | 1 |
| Food-safe scissors | 1 |
| Clean, dry workspace | N/A |
Instructions:
- Prepare Your Work Area: Confirm your workspace is clean and free from dust or moisture. Set everything up in advance so you can work efficiently.
- Prepare Royal Icing: If you haven’t already, prepare your royal icing and adjust its consistency to be slightly stiffer than you would for flooding. This will help create a strong outline.
- Fill the Piping Bag: Using your spatula, fill the piping bag with the royal icing until it is about two-thirds full. Secure the piping tip and twist the top of the bag to seal it.
- Check Your Grip: Hold the piping bag firmly but gently, pinching the top to maintain control over the icing flow. Practice your grip to guarantee stability.
- Start Outlining: Begin piping your design by carefully outlining the cookie shape. Apply even pressure on the piping bag as you move along the edges to form a solid line. If you need to take a break, you can use a damp cloth to cover the icing in the piping bag so it doesn’t dry out.
- Create Corners and Details: When you reach corners or intricate details, slow down and adjust your angle for more precision. You can use a toothpick or scribe tool to help guide the piping tip for those tricky spots.
- Fill Any Gaps: After outlining, inspect your work for any gaps or places where the icing may have broken. You can go back and carefully reinforce those sections with a little extra icing.
- Let it Dry: Allow the outline to dry completely before moving on to the flooding stage. This can take anywhere from 15 to 30 minutes, depending on the humidity and temperature in your environment.

- 100% Leak-proof: Guaranteed no-spill seal and secure latches
- Crystal-clear Tritan Built: Stain-resistant and odor-resistant material for a clear view of contents
- Lightweight & Sturdy: Easy to carry, yet durable for everyday use
Flooding Your Cookies Like a Pro

Flooding your royal icing Christmas cookies is an essential step that allows you to create a smooth and colorful finish to your designs. This technique involves filling in the outlined areas with a thinned royal icing that flows easily, creating a fluffy, glossy surface. Mastering the flooding technique not only elevates the appearance of your cookies but also permits for additional decorative elements to be added once your base layer dries.
| Ingredients/Tools | Quantity |
|---|---|
| Royal icing (prepared) | As needed (thinned, colored as desired) |
| Piping bag with round tip | 1 |
| Toothpick or scribe tool | 1 |
| Clean, dry workspace | N/A |
| Spray bottle or spoon (for thinning) | Optional |
Instructions:
- Prepare Your Royal Icing: If you haven’t yet, you will need to thin your royal icing for flooding. Gradually add small amounts of water to your prepared royal icing until it reaches a piping consistency that flows easily but holds its shape. A good test is to drizzle some icing over itself; it should disappear in about 10 seconds when it’s ready.
- Color the Icing: Divide your thinned royal icing into separate bowls to create your desired colors. Use gel food coloring for vibrancy, and mix thoroughly to guarantee an even color throughout.
- Fill the Piping Bag: Using a spatula, scoop the thinned royal icing into a piping bag fitted with a round tip (usually size 3 or 4 works well). Fill the bag about halfway to allow for easy control.
- Start Flooding: Begin flooding by carefully piping the thinned royal icing directly into the outlined sections of the cookie. Apply steady pressure as you move along the edges, allowing the icing to fill the area. Avoid overfilling to prevent spilling over the edges.
- Spread the Icing: If necessary, use a toothpick or scribe tool to help spread the icing into corners and areas that need coverage. Gently touch the surface of the icing to help it flow into place and fill in any spots that may need more icing.
- Remove Air Bubbles: If you see any air bubbles on the surface of the flooded icing, gently use the tip of a toothpick to pop them. This will create a smooth finish on your cookie.
- Let it Set: Allow the flooded icing to dry completely before adding any additional layers or decorations. The drying time can vary; typically, it takes several hours, while overnight drying is often preferred for best results.
- Check the Finish: After the icing is dry, check the surface for any imperfections or unevenness. You can go back and touch up any areas as needed.

- 𝗘𝗳𝗳𝗼𝗿𝘁𝗹𝗲𝘀𝘀 𝗪𝗲𝗶𝗴𝗵𝗶𝗻𝗴: Supports 5 units...
- 𝗣𝗿𝗲𝗰𝗶𝘀𝗲 𝗥𝗲𝘀𝘂𝗹𝘁𝘀: Accurately weighs up to 11 lb/5 kg with 1 g...
- 𝗦𝗶𝗺𝗽𝗹𝗲 & 𝗖𝗼𝗺𝗽𝗮𝗰𝘁: The small and sleek scale is a perfect fit for...
Add Details With Precision

Adding details to your royal icing Christmas cookies is a fun and creative way to elevate their appearance and make them uniquely yours. This technique allows you to add intricate designs, personalized touches, and additional colors to your cookies after they have been flooded and the base layer has dried. Whether it’s delicate snowflakes, whimsical patterns, or festive messages, using precision in your additions can transform your cookies into edible masterpieces.
| Ingredients/Tools | Quantity |
|---|---|
| Royal icing (prepared and stiff) | As needed (thinned for flooding, thick for detailing) |
| Piping bag with fine round tip | 1 |
| Parchment paper or wax paper | A few sheets (for practice) |
| Scissors | 1 |
| Toothpick or scribe tool | 1 |
| Clean, dry workspace | N/A |
Instructions:
- Prepare Your Royal Icing for Detailing: Guarantee you have a batch of royal icing ready that is at piping consistency but thicker than the flooding icing. This thickness allows for precise details and holds shape when piped.
- Color Your Contouring Icing: If you wish to use different colors for your details, divide your prepared royal icing into bowls. Add gel food coloring to each bowl and mix thoroughly to achieve vibrant and even colors for your designs.
- Fill the Piping Bag: Use a spatula to fill your piping bag fitted with a fine round tip (typically size 1 or 2). Fill it only halfway to maintain control over the icing flow when decorating.
- Practice on Parchment Paper: Before piping directly onto your cookies, practice your designs on parchment or wax paper. This helps you gauge the icing’s flow and your control, allowing you to perfect skinning techniques and patterns.
- Start Decorating: Once you’ve got your practice down, begin to pipe directly onto your beautifully flooded cookies. Apply consistent pressure to create your designs, whether it’s lines, dots, or detailed motifs.
- Add Details with Precision: When piping, keep a steady hand and maintain the same angle, about 45 degrees, to guarantee uniform designs. Use a toothpick or scribe tool to make adjustments, push icing around, or soften edges for more intricate patterns.
- Layering Technique: If you plan to add multiple elements or colors, remember to let each layer dry a bit before adding the next one. This will help maintain the structure of your designs and prevent colors from bleeding into one another.
- Allow to Dry Completely: Once you’ve finished adding your details, give your cookies ample drying time. This guarantees that your designs set appropriately and can withstand handling or additional layers without smearing.

- Instant Read Food Thermometer | Our instant read thermometer features a temperature probe and advanced,...
- Multi-Use | From bbq thermometer to baking thermometer, our digital food thermometer for cooking is...
- Easy-Read Digital Thermometer For Cooking | Large instant thermometer dial with bright blue backlight...
Be Mindful of Drying Times

When it comes to decorating royal icing Christmas cookies, being mindful of drying times is essential for achieving clean and professional-looking designs. Proper drying between layers guarantees that the colors do not bleed into one another and that your intricate details remain intact. This recipe outlines the steps to effectively manage drying times while decorating your royal icing cookies.
| Ingredients/Tools | Quantity |
|---|---|
| Royal icing (prepared, thinned for flooding) | As needed |
| Royal icing (prepared, thicker for detailing) | As needed |
| Food coloring (optional) | Various colors |
| Piping bags | 2-3 |
| Fine round piping tips | 1 |
| Small fan or a well-ventilated area | N/A |
| Timer | N/A |
Instructions:
- Prepare the Base Icing: Start by preparing your royal icing for the flooding layer. This should be a thinned consistency that flows smoothly when piped. Pair this with your chosen food coloring to create festive hues for the base of your cookies.
- Flood the Cookies: Pipe the thinned royal icing onto each cookie, spreading the icing gently with a small spatula or the back of a spoon to achieve an even layer. Be sure to cover the entire surface of the cookie for a seamless look.
- Let the Cookies Dry: Allow the flooded cookies to set. It generally takes about 20 to 30 minutes for the surface to dry touchably, but it’s best to wait at least 6-8 hours, or overnight, for the icing to fully harden depending on the humidity and temperature in your kitchen. Use a small fan if needed to circulate air and speed up the drying process.
- Prepare for Detailing: Once the base layer is dry, prepare your thicker royal icing for detailing. Use a separate piping bag fitted with a fine round tip for more precise decorations.
- Wait Before Adding Details: To avoid smudging or bleeding colors, wait until the surface is completely dry before piping any additional details on your cookies. This typically takes several hours. As you wait, you can practice your designs on parchment paper to guarantee smooth execution.
- Pipe the Details: With your icing bag ready, begin to add detailed designs on top of the dried flooded layer. Be consistent in your piping pressure and maintain the same angle throughout your decorating. This will assure even and beautiful results.
- Final Drying Time: Once all details are applied, allow the decorated cookies to dry completely. This can take anywhere from a few hours to overnight. Make sure they are placed in a dry area, as moisture can compromise the finish.
- Store or Display: Once the cookies are fully dry and set, they are ready to be enjoyed or stored. If not consuming immediately, store them in an airtight container to maintain their freshness without crushing the delicate icing designs.

- Versatile 54-Piece Collection: Elevate your kitchen with the Home Hero 54-Piece Kitchen Utensil Set, a...
- Durable and Long-Lasting: Crafted from premium stainless steel, these kitchen utensils are designed to...
- Perfect Holiday Gift: Delight your loved ones with this kitchen utensils gift set this festive season....
Experiment With Different Design Styles

Creating beautiful royal icing Christmas cookies is both an art and a joy, especially when you allow yourself to experiment with various design styles. Whether you prefer classic holiday motifs, whimsical characters, or intricate patterns, exploring different techniques can help you develop your own unique style while making your cookies stand out this festive season.
| Ingredients/Tools | Quantity |
|---|---|
| Royal icing (prepared, thinned for flooding) | As needed |
| Royal icing (prepared, thicker for detailing) | As needed |
| Food coloring (various colors) | Various colors |
| Piping bags | 2-3 |
| Fine round piping tips | 1 |
| Toothpick or scribe tool | 1 |
| Edible glitter or sprinkles (optional) | As desired |
Instructions:
1. Choose Your Design Style: Before you begin, decide on the design style you want to explore. Some popular options include classic snowflakes, fun holiday characters, or geometric patterns. You might even want to create a theme like a winter wonderland or a cozy Christmas scene.
2. Prepare Your Workspace: Set up a clean, clutter-free workspace with all your tools and ingredients in easy reach. This makes it easier to focus on your designs without distractions.
3. Prepare Base and Detailing Icing: As before, prepare your royal icing for flooding, verifying it has a thin consistency. Color it in varying shades if desired. For detailing, prepare thicker royal icing and use a piping bag fitted with a fine round tip.
4. Flood the Cookies: Starting with your chosen cookie shapes, flood the surface with the thinned royal icing. Use a small spatula or the back of a spoon to spread the icing evenly. Let the cookies set until the surface is dry to the touch, typically 20-30 minutes, but ideally allowing for longer drying.
5. Test Your Techniques: Before adding detail to your cookies, practice your designs on parchment paper. This helps you get comfortable with piping pressure and movement.
6. Add Various Design Elements: Start piping your detailed designs on top of the dried base layer. Play with styles like:
- Piped Patterns: Create stripes, dots, or swirls for a modern look.
- Character Decor: Use shapes and colors to make festive characters (e.g., Santa, snowmen).
- Floral Motifs: Incorporate wreaths or holly leaves for a nature-themed approach.
7. Incorporate Additional Elements: While the icing is still wet, sprinkle edible glitter or sprinkles to add texture and sparkle. If you are working with detailed designs, use a toothpick or scribe tool to create fine lines or to clean up edges.
8. Final Touches: Once all designs are complete, let your cookies dry completely, ideally overnight. This verifies that all elements adhere well and sets your designs in place.
9. Admire Your Work: Once dry, take a moment to admire your beautifully decorated cookies! Each one will reflect your creativity and design choices.
Enjoy the process, and remember that practice will help you refine your skills and develop your unique cookie decorating style!

- 24-ounce insulated stainless-steel water bottle with a FreeSip spout and push-button lid with lock
- Patented FreeSip spout designed for either sipping upright through the built-in straw or tilting back to...
- Protective push-to-open lid keeps spout clean; convenient carry loop doubles as a lock
Store and Transport Your Cookies Safely

After spending time decorating beautiful royal icing Christmas cookies, it’s crucial to make sure they are stored and transported safely to maintain their freshness and appearance. This guide will walk you through the necessary steps to preserve your festive treats so they can be enjoyed by your family and friends.
| Ingredients/Tools | Quantity |
|---|---|
| Clean, dry cookie boxes | As needed |
| Parchment paper or wax paper | As needed |
| Airtight storage containers | 1-2 |
| Plastic wrap or aluminum foil | As needed |
| Labels (optional) | As needed |
Instructions:
- Allow Cookies to Dry Completely: Make sure your decorated cookies have dried fully before storing them. This may take several hours or ideally overnight, depending on the humidity and thickness of the icing.
- Use Parchment or Wax Paper: Prepare to stack your cookies by placing a sheet of parchment or wax paper at the bottom of your storage container. This will help prevent sticking and preserve the designs.
- Stack Carefully: If your cookies are flat, you can stack them. Place a layer of cookies on the parchment paper, leaving space between them. If your cookies have intricate designs, consider storing them in single layers, separated by parchment paper.
- Cover with Additional Parchment Paper: Once you’ve stacked your cookies, gently cover them with another layer of parchment or wax paper. This will help protect the icing and any delicate decorations.
- Seal in Containers: Place your cookie-filled containers into airtight storage containers or boxes. Make sure the lids fit snugly to avoid air exposure. If you’re using plastic wrap or foil, wrap the entire container tightly.
- Label the Containers: For added organization, label each container with the type of cookies, date made, and a note about any specific ingredients, especially if sharing with others who have allergies.
- Transport with Care: If you are transporting your cookies to an event, secure your containers in the vehicle to prevent them from sliding around. If possible, place them in a cooler or insulated bag to maintain their freshness, especially if the weather is warm.
- Display and Serve: Once you’ve reached your destination, take care in unpacking your cookies. Display them on a decorative platter to showcase your hard work. Enjoy sharing them with family and friends!
Learn From Your Mistakes

Making royal icing Christmas cookies can be a delightful yet sometimes challenging experience. Mistakes made during the cookie decorating process are often a fantastic opportunity for learning and skill improvement. From achieving the right icing consistency to mastering intricate techniques, this recipe will help you embrace your missteps and refine your cookie-decorating skills.
| Ingredients/Tools | Quantity |
|---|---|
| Powdered sugar | 4 cups |
| Meringue powder | 4 tablespoons |
| Warm water | 5-6 tablespoons |
| Food coloring (optional) | As desired |
| Cookie cutters | As needed |
| Piping bags | 2-3 |
| Toothpick or scribe tool | 1 |
| Mixing bowl | 1 |
Instructions:
- Prepare Your Ingredients: Gather all ingredients and tools you will need for your royal icing. Make sure your mixing bowl and piping bags are clean and dry to guarantee the best results.
- Mix Royal Icing: In a mixing bowl, combine 4 cups of powdered sugar and 4 tablespoons of meringue powder. Slowly add 5-6 tablespoons of warm water, mixing on low speed with a hand mixer or stand mixer until the icing is smooth and has a glossy finish. Scrape the sides of the bowl as necessary to ensure everything is well incorporated.
- Test for Consistency: Check the consistency of the icing by lifting the beater or paddle; it should hold stiff peaks. If it’s too thick, add a teaspoon of water at a time until you reach the desired consistency. If it’s too runny, mix in more powdered sugar. Remember that learning from mistakes means adjusting as you go along!
- Divide and Color: If you wish to use multiple colors, divide the royal icing into separate bowls, and add your desired food coloring to each. Mix well, and remember to note what works best for future reference.
- Fill Piping Bags: Once colored, transfer the royal icing into piping bags fitted with small round tips. To minimize mess, a funnel can help fill the piping bags more easily. Allowing for different icing consistencies can improve your design flexibility and help you learn how to achieve various effects.
- Decorate Your Cookies: Begin decorating your cookies by outlining them with the stiff icing first. Allow this outline to dry for a few minutes before filling in the center with the thinned icing. Use a toothpick or scribe tool to spread it evenly and remove any air bubbles. Don’t hesitate to experiment and note what happens when you try different techniques—every attempt provides valuable information!
- Let Them Dry: Allow the decorated cookies to dry completely, ideally overnight. If you’re unsure how long to dry, test a small cookie and keep track of the drying time for future decorating sessions.
- Reflect on the Process: After decorating, take a moment to reflect on what worked well and what didn’t. Were there mistakes you made? Did the icing run too much or not spread well? Write these observations down for your next session. Each batch of cookies teaches you something different!
Learning from your mistakes not only enhances your cookie-decorating skills but also adds a personal touch to your baking journey. Every error and correction leads to a more enjoyable and refined experience in the kitchen. Happy decorating!