Essential Ingredients for the Perfect Swirl Cookies

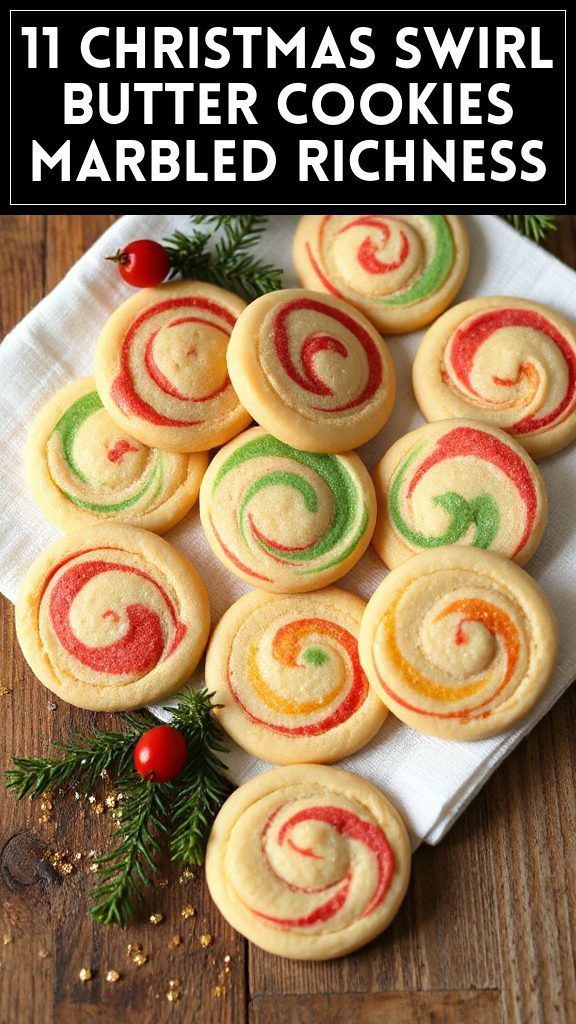
Christmas Swirl Butter Cookies are a delightful treat that combines rich buttery flavor with festive swirls of color. These cookies are not only tasty but also visually appealing, making them a perfect addition to your holiday cookie platter. With simple ingredients and easy preparation steps, you can create a batch of these charming cookies that will impress friends and family alike.
| Ingredient | Quantity |
|---|---|
| Unsalted butter | 1 cup (2 sticks) |
| Granulated sugar | 3/4 cup |
| Powdered sugar | 1/4 cup |
| Vanilla extract | 1 teaspoon |
| All-purpose flour | 2 cups |
| Baking powder | 1 teaspoon |
| Salt | 1/4 teaspoon |
| Food coloring | 2 colors |
| Sprinkles (optional) | For decoration |
Cooking Steps Instructions:
- Prepare the Dough: In a large mixing bowl, beat 1 cup of unsalted butter, 3/4 cup of granulated sugar, and 1/4 cup of powdered sugar together using an electric mixer until the mixture is light and fluffy. This usually takes about 2-3 minutes. Add in 1 teaspoon of vanilla extract and beat until combined.
- Combine Dry Ingredients: In a separate bowl, whisk together 2 cups of all-purpose flour, 1 teaspoon of baking powder, and 1/4 teaspoon of salt until thoroughly blended.
- Mix Dry and Wet Ingredients: Gradually add the dry ingredient mixture to the butter mixture, mixing on low speed until just combined. Be careful not to overmix; the dough should come together without any dry spots.
- Divide the Dough: Once the dough is ready, divide it into two or three equal parts, depending on the number of colors you want to create.
- Add Food Coloring: Add a few drops of food coloring to each portion of dough, kneading it with your hands until the color is evenly distributed. Create one portion of dough in red, and another in green, leaving one portion plain, or use additional colors as desired.
- Roll the Dough: On a floured surface, take one color of the dough and roll it into a log shape, about 1 inch in diameter. Wrap it in plastic wrap and refrigerate for about 30 minutes. Repeat this step with the other colors of dough.
- Create the Swirl: After chilling, take the logs out of the refrigerator and gently remove the plastic wrap. Place the logs next to each other and press them together slightly. Start rolling them together from one end to create a swirl effect. Wrap the new combined log in plastic wrap and refrigerate for an additional 30 minutes to firm up.
- Preheat and Slice: Preheat your oven to 350°F (175°C). Once the dough is firm, remove it from the refrigerator, and slice it into about 1/4 inch thick rounds.
- Bake the Cookies: Place the cookie slices onto a baking sheet lined with parchment paper, leaving space between each cookie. Optionally, sprinkle the tops with festive sprinkles.
- Bake: Bake in the preheated oven for 10-12 minutes or until the edges just start to turn golden. Remove from the oven and allow the cookies to cool on the baking sheet for a few minutes before transferring them to a wire rack to cool completely.
Enjoy your Christmas Swirl Butter Cookies with family and friends throughout the festive season!

- The Original Pro Chopper - Our superstar veggie slicer has been creating waves on TikTok! Simple to use,...
- Easy Meal Prep with Rust-Resistant Blades - Our vegetable chopper is perfect for anyone who wants to eat...
- 5-Star Design - The soft-grip TPU handle ensures controlled chopping, while the non-skid rubber base...
Step-by-Step Instructions to Create the Batter

Christmas Swirl Butter Cookies are festive, colorful treats that bring cheer to any holiday gathering. By following these step-by-step instructions, you can create a delicious and visually appealing cookie batter that will serve as the foundation for your beautiful swirl cookies.
| Ingredient | Quantity |
|---|---|
| Unsalted butter | 1 cup (2 sticks) |
| Granulated sugar | 3/4 cup |
| Powdered sugar | 1/4 cup |
| Vanilla extract | 1 teaspoon |
| All-purpose flour | 2 cups |
| Baking powder | 1 teaspoon |
| Salt | 1/4 teaspoon |
| Food coloring | 2 colors |
Cooking Steps Instructions:
- Prepare the Mixing Bowl: Start by gathering all your ingredients and equipment. Choose a large mixing bowl and an electric mixer for ease of preparation.
- Cream the Butters and Sugars: Add 1 cup of unsalted butter, 3/4 cup of granulated sugar, and 1/4 cup of powdered sugar into the mixing bowl. Using the electric mixer on medium speed, beat the mixture until it becomes light and fluffy. This should take about 2-3 minutes.
- Incorporate Vanilla: Once your butter mixture is fluffy, measure out 1 teaspoon of vanilla extract and add it to the bowl. Mix it on low speed until the vanilla is fully incorporated.
- Mix Dry Ingredients: In a separate bowl, whisk together 2 cups of all-purpose flour, 1 teaspoon of baking powder, and 1/4 teaspoon of salt until the ingredients are well combined.
- Combine Wet and Dry Mixtures: Gradually add the dry ingredient mixture to the wet mixture in the large mixing bowl. It is important to do this slowly and mix on low speed until just combined. Make sure not to overmix; the dough should form without any dry floury spots visible.
- Check the Consistency: The cookie batter is ready when it has a soft, pliable consistency. If it feels too sticky, you may consider adding a tablespoon of extra flour, but it should not be overly dry.
- Divide the Dough: Once the batter is well mixed, transfer it onto a clean work surface. Divide the dough into two or three equal portions based on how many colors you wish to create.
- Add Food Coloring: Take each portion of dough and, wearing gloves to avoid staining your hands, knead in a few drops of your chosen food coloring. Continue kneading until the color is fully blended into the dough.
- Prepare for Rolling: After coloring each portion of dough, you’ll want to shape them into logs. This involves rolling each colored dough between your palms until it reaches a 1-inch diameter log shape.

- Makes Everything Simple : Just forget your bagged cheese! Only turn the handle for several times and get...
- Premium Material : All parts of the rotary cheese grater are made of food grade ABS material, no BPA. The...
- Three Option Grater : The parmesan cheese grater finishes food preparation with slicing, shredding and...
How to Achieve the Perfect Swirl Effect

Christmas Swirl Butter Cookies are not only delightful to eat but also visually stunning, making them perfect for holiday celebrations. Achieving that perfect swirl effect in your cookies requires some careful handling and technique. Follow these instructions to learn how to create beautiful, colorful swirls that will surely impress your family and friends.
| Ingredient | Quantity |
|---|---|
| Colored cookie dough | From previous step |
| Flour (for dusting) | As needed |
Cooking Steps Instructions:
- Prepare Your Work Surface: Before starting with your colored dough, lightly dust your work surface with flour to prevent sticking.
- Roll Out the Dough: Take one portion of your colored cookie dough and roll it into a log shape about 12 inches long. Repeat this with the other colored dough portions you have prepared, ensuring they are of similar length.
- Align the Logs: Place the logs of dough side by side on the floured surface, ensuring they are touching. The more the colors touch, the more integrated your swirls will be.
- Press Together Gently: Lightly press down the logs so they stick together, making sure not to mash the dough too much or lose their shape.
- Twist the Logs: Starting from one end, gently twist the two or three colored logs together like a braid. This creates an essential base for the swirl effect. Continue twisting until you reach the other end.
- Shape the Dough into a Log: After twisting, form the dough into a single log shape about 2-3 inches in diameter. Tightly wrap the log in plastic wrap, ensuring all areas are covered to maintain moisture.
- Chill the Dough: Place the wrapped log in the refrigerator for at least 1 hour (or overnight if you prefer). Chilling will firm up the dough, making it easier to slice and helping maintain the swirl shape during baking.
- Slice the Dough: Once chilled, remove the dough from the refrigerator and unwrap it. Using a sharp knife, cut the log into 1/4 to 1/2-inch thick slices. The cross-section of each slice should reveal a beautiful swirl pattern.
- Arrange on Baking Sheet: Preheat your oven to 350°F (175°C). Place the sliced cookies on a baking sheet lined with parchment paper, leaving enough space between each cookie to allow for spreading.
- Bake the Cookies: Bake in the preheated oven for 10-12 minutes or until the edges are lightly golden. Be careful not to overbake, as you want them to remain soft and chewy.
- Cool and Serve: Once baked, let the cookies cool on the baking sheet for a few minutes before transferring them to a wire rack to cool completely. Enjoy your beautifully swirled Christmas Butter Cookies as a festive treat!

- 💰 REDUCE WASTE AND SAVE MONEY: Chef Preserve keeps FOOD FRESH 5 TIMES LONGER than non-vacuum storage...
- ✅ POWERFUL, QUICK & EASY TO USE: Simply press the button to start. The device vacuum seals a bag in 5...
- ♻️ REUSABLE & RESEALABLE BAGS: Chef Preserve comes with dishwasher, freezer, refrigerator, and...
Baking Tips for Soft and Chewy Cookies

Baking soft and chewy Christmas Swirl Butter Cookies takes a bit of technique, but the end results are well worth it. By following these tips and the right methods, you’ll create cookies that are tender, flavorful, and delightfully chewy, making them a perfect treat for the holiday season.
| Ingredient | Quantity |
|---|---|
| Unsalted butter | 1 cup (2 sticks) |
| Granulated sugar | 3/4 cup |
| Brown sugar | 3/4 cup |
| Large eggs | 2 |
| Vanilla extract | 1 teaspoon |
| All-purpose flour | 2 1/4 cups |
| Baking soda | 1 teaspoon |
| Salt | 1/2 teaspoon |
| Cornstarch | 1 tablespoon |
| Optional: chocolate chips or nuts | 1 cup (for added texture) |
Cooking Steps Instructions:
- Preheat the Oven: Begin by preheating your oven to 350°F (175°C), preparing it for baking your delicious cookies.
- Cream Butter and Sugars: In a large mixing bowl, use a hand mixer or stand mixer to beat together the softened unsalted butter, granulated sugar, and brown sugar until the mixture is light and fluffy. This process incorporates air into the dough, contributing to the chewy texture.
- Add Eggs and Vanilla: Once the butter and sugars are well combined, add the eggs one at a time, mixing well after each addition. Following the eggs, add the vanilla extract and blend until smooth.
- Combine Dry Ingredients: In a separate bowl, whisk together the all-purpose flour, baking soda, salt, and cornstarch. The cornstarch is key to achieving that soft, chewy texture as it helps to tenderize the cookies.
- Mix Dry Ingredients with Wet Mixture: Gradually add the dry ingredient mixture to the wet batter, mixing on low speed just until combined. Be careful not to overmix, as this can lead to tougher cookies.
- Incorporate Optional Add-ins: If you wish to include chocolate chips or nuts, gently fold them into the dough using a spatula. This adds flavor and texture to your cookies.
- Chill the Dough (Optional but Recommended): For extra chewy cookies, consider chilling the dough for at least 30 minutes in the refrigerator. This helps prevent spreading during baking.
- Scoop Cookie Dough: Use a cookie scoop or tablespoon to portion out the dough, placing each scoop onto a baking sheet lined with parchment paper. Leave enough space between each cookie to allow for spreading.
- Bake the Cookies: Place the baking sheet in the oven and bake for about 10-12 minutes. The edges should be lightly golden while the center remains soft.
- Let Cookies Cool: After baking, remove the cookies from the oven and allow them to cool on the baking sheet for 5 minutes. Then, transfer them to a wire rack to cool completely. This final step guarantees they’ll maintain their soft and chewy texture.
Enjoy your delicious Christmas Swirl Butter Cookies with the perfect chewy texture—ideal for sharing during the holidays!

- Generous Capacity: 7-quart slow cooker that comfortably serves 9+ people or fits a 7-pound roast
- Cooking Flexibility: High or low slow cooking settings, with convenient warm function for ideal serving...
- Convenient: Set it and forget it feature enables you to cook while at work or performing daily tasks
Decorating Ideas to Enhance Your Swirl Cookies

Christmas Swirl Butter Cookies are not just delicious; they are a canvas for creativity! Decorating these cookies allows you to express the festive spirit while adding an extra layer of delight. Whether you’re hosting a holiday gathering or looking for a fun activity to do with loved ones, these decorating ideas will elevate your swirl cookies to a stunning holiday treat.
| Ingredient | Quantity |
|---|---|
| Royal icing | 2 cups (prepared) |
| Food coloring | Various colors |
| Sprinkles | Assorted, for garnish |
| Edible glitter | Optional |
| Mini candy canes | For decoration |
| Whipped cream (optional) | For serving |
| Chocolate (melted) | For drizzling |
| Coconut flakes (sweetened) | Optional, for a snowy effect |
Cooking Steps Instructions:
- Prepare Your Work Area: Before starting the decorating process, set up a clean workspace. Have all your decorations ready and organized for easy access.
- Cool the Cookies: Verify that your baked Christmas Swirl Butter Cookies have cooled completely on a wire rack. This prevents the icing and decorations from melting or sliding off.
- Prepare the Royal Icing: If you haven’t yet prepared royal icing, whisk together powdered sugar and egg whites or meringue powder, adding a few teaspoons of water until you reach a piping consistency.
- Color the Icing: Divide the icing into small bowls and add food coloring to create different colors. Mix well until you achieve your desired shades.
- Outline Cookies: Using a piping bag fitted with a small round tip (or a plastic squeeze bottle), outline the edges of each cookie with royal icing. This acts as a barrier to keep the next layer of icing within the lines.
- Flood the Cookies: After outlining, use a slightly thinner royal icing to flood the center of the cookies. You can either pipe this directly or use a spatula to spread it evenly. Allow the icing to settle and smooth out for a glossy finish.
- Add Additional Decorations: While the icing is still wet, sprinkle assorted sprinkles or edible glitter on top for extra texture and sparkle. You can also place mini candy canes on top for a festive touch.
- Create Drizzles (Optional): If you want to add melted chocolate drizzles, wait until the royal icing is dry, then melt chocolate in a microwave. Use a piping bag to drizzle the melted chocolate over the cookies for an elegant finish.
- Optional Coconut Flakes: For a snowy effect, dip the edges of the cookies in melted chocolate and then into sweetened coconut flakes.
- Let Dry: Allow the decorated cookies to dry completely at room temperature. This could take several hours or overnight, depending on your icing’s thickness.
- Serve or Package: Once dry, your beautifully decorated Christmas Swirl Butter Cookies are ready to be served or packaged as thoughtful gifts for friends and family. Enjoy the festive spirit!

- 100% Leak-proof: Guaranteed no-spill seal and secure latches
- Crystal-clear Tritan Built: Stain-resistant and odor-resistant material for a clear view of contents
- Lightweight & Sturdy: Easy to carry, yet durable for everyday use
Storage Tips for Freshness and Flavor

Christmas Swirl Butter Cookies are not only a treat to decorate, but they also require proper storage to maintain their delightful flavor and texture. Whether you plan to enjoy them over a few days or store them for upcoming holiday gatherings, following these storage tips will guarantee that your cookies remain fresh and delicious.
| Ingredient | Quantity |
|---|---|
| Christmas Swirl Butter Cookies | As needed |
| Airtight container | 1 large |
| Parchment paper | As needed |
| Plastic wrap | As needed |
| Freezer-safe bags | (optional) |
Cooking Steps Instructions:
- Cool Completely: After baking, allow your Christmas Swirl Butter Cookies to cool completely on a wire rack. This step is essential as it prevents steam from moisture accumulation, which can lead to soggy cookies.
- Layer with Parchment Paper: If stacking cookies, place a sheet of parchment paper between each layer in the storage container. This will help minimize sticking and maintain the integrity of the decorated surfaces.
- Seal in an Airtight Container: Choose a large, airtight container to store your cookies. Place the cookies in the container upright, if possible, or on their side, making sure they are not touching each other to avoid any damage to the decorations.
- Wrap for Extra Protection (if necessary): For added protection, you can also wrap individual cookies with plastic wrap before placing them in the container. This is particularly useful for delicate decorations or if the cookies are likely to be stored for an extended period.
- Store at Room Temperature: Store the airtight container in a cool, dry place at room temperature. Avoid placing them in direct sunlight or near heat sources as this can affect their texture.
- Freezing for Longer Storage (if desired): If you want to keep your cookies for more than a week, consider freezing them. Place the cooled cookies in freezer-safe bags or containers, ensuring as much air is removed as possible. They can be kept in the freezer for up to three months.
- Thawing Instructions: When you’re ready to enjoy your frozen cookies, simply remove the desired number from the freezer and let them thaw at room temperature for a few hours. Avoid microwaving or using a heated oven for thawing, as this can alter the texture and flavor of the cookies.

- 𝗘𝗳𝗳𝗼𝗿𝘁𝗹𝗲𝘀𝘀 𝗪𝗲𝗶𝗴𝗵𝗶𝗻𝗴: Supports 5 units...
- 𝗣𝗿𝗲𝗰𝗶𝘀𝗲 𝗥𝗲𝘀𝘂𝗹𝘁𝘀: Accurately weighs up to 11 lb/5 kg with 1 g...
- 𝗦𝗶𝗺𝗽𝗹𝗲 & 𝗖𝗼𝗺𝗽𝗮𝗰𝘁: The small and sleek scale is a perfect fit for...
Creative Variations to Try This Holiday Season

Christmas Swirl Butter Cookies are a festive favorite that can be customized in countless ways to suit your taste and creativity. Adding different flavors, colors, or toppings transforms these classic cookies into unique treats perfect for your holiday celebrations. Here are a few creative variations you can try this season:
| Ingredient | Quantity |
|---|---|
| All-purpose flour | 2 ½ cups |
| Unsalted butter, softened | 1 cup (2 sticks) |
| Granulated sugar | 1 cup |
| Powdered sugar | ½ cup |
| Egg | 1 large |
| Vanilla extract | 1 teaspoon |
| Almond extract | ½ teaspoon |
| Baking powder | 1 teaspoon |
| Salt | ½ teaspoon |
| Food coloring (red, green) | As desired |
| Sprinkles or edible glitter | For decoration |
Cooking Steps Instructions:
- Prepare the Dough: In a large mixing bowl, cream together the softened butter, granulated sugar, and powdered sugar until the mixture is light and fluffy. This may take about 3-5 minutes using an electric mixer. Then, add in the egg, vanilla extract, and almond extract, beating until well combined.
- Combine Dry Ingredients: In a separate bowl, whisk together the all-purpose flour, baking powder, and salt. Gradually add this dry mixture to the butter mixture, mixing on low speed until just combined. Do not overmix.
- Divide the Dough: Once the dough is mixed, divide it into two or three equal portions, depending on how many colors you wish to use.
- Add Coloring: In each portion of dough, add a few drops of food coloring to achieve your desired color. Mix gently until the color is evenly distributed throughout the dough.
- Shape the Dough: Place each colored dough on a sheet of parchment paper. Roll each portion into a log, approximately 1-2 inches in diameter. Make sure they are tightly wrapped in the parchment. Refrigerate the logs for at least 1-2 hours or until they are firm.
- Preheat the Oven: Preheat your oven to 350°F (175°C) while the dough is chilling.
- Slice and Bake: Once the dough is firm, remove it from the refrigerator and unwrap it. Use a sharp knife to slice the logs into ¼-inch thick cookies. Place the cookies on a baking sheet lined with parchment paper about 2 inches apart.
- Decorate (Optional): If desired, sprinkle the tops of the cookies with sprinkles or edible glitter for a festive touch before baking.
- Bake the Cookies: Bake in the preheated oven for 10-12 minutes or until the edges are lightly golden. The cookies should remain soft in the center.
- Cool and Serve: Allow the cookies to cool on the baking sheet for a couple of minutes before transferring them to a wire rack to cool completely. Enjoy your beautifully swirled butter cookies as a delightful addition to your holiday festivities!

- Instant Read Food Thermometer | Our instant read thermometer features a temperature probe and advanced,...
- Multi-Use | From bbq thermometer to baking thermometer, our digital food thermometer for cooking is...
- Easy-Read Digital Thermometer For Cooking | Large instant thermometer dial with bright blue backlight...
Pairing Suggestions for a Festive Treat Experience

Christmas Swirl Butter Cookies are not only visually stunning with their vibrant colors but also buttery and rich in flavor, making them a perfect festive treat. These cookies pair wonderfully with a variety of beverages and accompaniments, enhancing the experience of enjoying them during the holiday season.
| Ingredient | Quantity |
|---|---|
| Christmas Swirl Butter Cookies (from previous recipe) | 2 dozen cookies |
| Hot chocolate | 2 cups |
| Eggnog | 2 cups |
| Coffee (brewed) | 2 cups |
| Tea (chai or peppermint) | 2 cups |
| Milk (for dipping) | 1 cup |
| Assorted fruit (fresh berries, orange slices) | For garnish |
| Cheeses (cream cheese, brie, or goat cheese) | For pairing |
| Nuts (almonds, walnuts, or pecans) | For munching |
Cooking Steps Instructions:
- Prepare the Beverages: Begin by preparing your choosing of drinks. For hot chocolate, heat milk in a saucepan and whisk in cocoa powder and sugar until smooth. For eggnog, mix egg yolks and sugar, then fold in whipped cream and milk with your preferred spices like nutmeg and cinnamon. Brew your coffee to your liking, or steep tea bags in hot water to create a soothing cup of chai or peppermint tea.
- Set Up Your Pairing Table: Arrange your Christmas Swirl Butter Cookies on a festive platter. Place your prepared beverages in charming mugs or cups, making them easily accessible to guests.
- Add Accompaniments: To elevate the experience, add a selection of fresh fruits, such as berries and orange slices, next to the cookies. This will not only add color to your table but also a revitalizing contrast to the rich buttery cookies.
- Incorporate Cheese and Nuts: Add small dishes or boards featuring delicious cheeses like cream cheese, brie, or goat cheese that complement the sweetness of the cookies. Additionally, sprinkle a variety of nuts like almonds, walnuts, or pecans around the platter for crunch and flavor.
- Create a Tasting Experience: Invite your guests to mix and match their cookies with different beverages and accompaniments. Encourage them to dip cookies into milk, enjoy them with a slice of cheese, or pair them with a sip of hot chocolate or coffee.
- Festive Presentation: To enhance the atmosphere of the occasion, consider adding holiday-themed napkins, decorative plates, or twinkling lights around your setup. This will create a festive ambiance that enhances the enjoyment of each bite and sip.
- Enjoy Together: Finally, gather together to share in the festive treat experience, making the most of the delicious flavors and the holiday spirit.

- Versatile 54-Piece Collection: Elevate your kitchen with the Home Hero 54-Piece Kitchen Utensil Set, a...
- Durable and Long-Lasting: Crafted from premium stainless steel, these kitchen utensils are designed to...
- Perfect Holiday Gift: Delight your loved ones with this kitchen utensils gift set this festive season....
Sharing the Joy: Gift-Worthy Packaging Ideas

Christmas Swirl Butter Cookies make for an ideal gift during the holiday season. Their colorful appearance and rich taste not only delight the palate but also bring a touch of festive cheer. To help you share these delicious treats with friends and family, here are some creative packaging ideas that will guarantee your cookies look as good as they taste.
| Ingredient | Quantity |
|---|---|
| Christmas Swirl Butter Cookies | 2 dozen cookies |
| Decorative gift boxes | 1-2 boxes |
| Cellophane bags | 4-6 bags |
| Ribbon (in festive colors) | 1 roll |
| Gift tags | 4-6 pieces |
| Tissue paper or shred | As needed |
| Decorative labels or stickers | A few |
Cooking Steps Instructions:
- Choose Your Packaging: Decide whether you want to use decorative gift boxes or cellophane bags. Gift boxes are great for a more formal presentation, while cellophane bags offer a fun, informal option.
- Line Your Boxes or Bags: If using gift boxes, consider lining them with tissue paper or shredded paper for an elegant touch. This not only adds padding to protect your cookies but also creates a visually appealing backdrop.
- Layer the Cookies: If you’re using boxes, place a layer of cookies on the bottom. If your cookies are quite crumbly, consider adding a sheet of parchment paper between layers to prevent them from sticking together. You might be able to fit 12-14 cookies per box depending on size.
- Fill Cellophane Bags: For cellophane bags, place the cookies inside carefully so they don’t crumble. Aim for 4-6 cookies per bag, guaranteeing that they are standing upright and visible through the clear cellophane.
- Seal and Secure: If you are using cellophane bags, gather the top and tie it secure with a festive ribbon. For gift boxes, close the lid securely, and if desired, you may also tie a ribbon around the box for a finished look.
- Add Gift Tags or Labels: Write a sweet message on the gift tags, indicating the contents or a personal note, and attach them to each package. You can also use decorative labels or stickers that match your holiday theme to give your gifts a polished appearance.
- Final Touches: Consider adding a sprinkle of edible glitter or a few small ornaments on top for extra sparkle. Arrange your finished packages on a table or in a basket for an eye-catching display that showcases your thoughtful gifts.
With these packaging ideas, your Christmas Swirl Butter Cookies will not only taste delicious but also look festive and inviting, making them perfect for gifting and sharing joy during the holiday season.